> ## Documentation Index
> Fetch the complete documentation index at: https://auth0.com/ai/docs/llms.txt
> Use this file to discover all available pages before exploring further.
# Authorization for RAG
> Learn how Auth0 for AI Agents enables AI agents to implement fine-grained authorization for Retrieval Augmented Generation (RAG).
export const DownloadQuickstartButton = ({category, framework, label = "Download Sample"}) => {
const [isDownloading, setIsDownloading] = useState(false);
const githubRepo = 'auth0-samples/auth0-ai-samples';
const filename = `${category}-${framework}-sample.zip`;
const downloadSample = () => {
setIsDownloading(true);
const downloadUrl = `https://github.com/${githubRepo}/releases/latest/download/${filename}`;
window.open(downloadUrl, '_blank');
setTimeout(() => setIsDownloading(false), 1000);
};
return
;
};
export const AccountAndAppSteps = ({applicationType = "Regular Web Applications", callbackUrl = "http://localhost:3000/auth/callback", logoutUrl = "http://localhost:3000", appCreation = true, allowedWebOrigins, copyDomain, enableTokenVaultGrant = false, enableRefreshTokenGrant = false, enableAllowRefreshTokenRotation = undefined}) => {
const steps = [
To continue with this quickstart, you need to have an{" "}
Auth0 account.
];
if (appCreation) {
steps.push(
Go to your{" "}
Auth0 Dashboard
{" "}
to create a new Auth0 Application.
Scroll down to the Refresh Token Rotation section and {enableAllowRefreshTokenRotation === true ? "enable" : "disable"} the Allow Refresh Token Rotation option.
Scroll down and expand the Advanced section. Switch to the Grant Types tab and enable the Token Vault and Refresh Token grant types.
}
Click Save in the bottom right to save your
changes.
To learn more about Auth0 applications, read{" "}
Applications
.
);
}
return steps;
};
export const Prerequisites = ({callbackUrl = "http://localhost:3000/auth/callback", logoutUrl = "http://localhost:3000", appCreation = true, createAuth0ApiStep = undefined}) => {
const steps = [];
if (appCreation) {
steps.push(...AccountAndAppSteps({
callbackUrl,
logoutUrl,
appCreation
}));
}
if (createAuth0ApiStep) {
steps.push(
In your Auth0 Dashboard, go to{" "}
Applications > APIs.
Create a new API with an identifier (audience).
Once API is created, go to the APIs{" "}
Settings > Access Settings and enable{" "}
Allow Offline Access.
Note down the API identifier for your environment variables.
To learn more about Auth0 APIs, read{" "}
APIs
.
);
}
steps.push(
You need an{" "}
Auth0 FGA account
{" "}
to complete this quickstart.
,
Set up an{" "}
OpenAI account and API key
.
);
return <>
Prerequisites
Before getting started, make sure you:
{steps}
;
};
Auth0 for AI Agents leverages [Auth0 FGA](https://auth0.com/fine-grained-authorization) to provide fine-grained authorization control for AI agents. As a result, when AI agents use Retrieval Augmented Generation (RAG) to provide sophisticated, relevant responses to user queries, they only have access to authorized data.
By the end of this quickstart, you should have an AI application that can:
1. Retrieve authorized data as context for a RAG pipeline.
2. Use Auth0 FGA to determine if the user has authorization for the data.
## Pick your tech stack
### Download sample app
Start by downloading and extracting the sample app. Then open in your preferred IDE.
### Install dependencies
In the root directory of your project, install the following dependencies:
* `@auth0/ai-langchain`: [Auth0 AI SDK for LangChain](https://github.com/auth0/auth0-ai-js/tree/main/packages/ai-langchain) built for AI agents powered by LangChain.
* `@langchain/langgraph`: For building stateful, multi-actor applications with LLMs.
* `langchain`: The LangChain library.
* `@langchain/core`: Core LangChain dependencies.
* `@langchain/openai`: [OpenAI](https://js.langchain.com/docs/integrations/chat/openai) provider for LangChain.
* `zod`: TypeScript-first schema validation library.
* `langgraph-nextjs-api-passthrough`: API passthrough for LangGraph.
```bash wrap lines theme={null}
npm install @auth0/ai-langchain@4 @langchain/core@0.3.77 @langchain/langgraph@0.4.4 @langchain/openai@0.6.13 langchain@0.3.12 langgraph-nextjs-api-passthrough@0.1.4
```
### Update the environment file
Copy the `.env.example` file to `.env.local` and update the variables with your Auth0 credentials. You can find your Auth0 domain, client ID, and client secret in the application you created in the Auth0 Dashboard.
### Set up an FGA Store
In the [Auth0 FGA dashboard](https://dashboard.fga.dev/):
Navigate to **Settings**. In the **Authorized Clients** section, click **+
Create Client**.
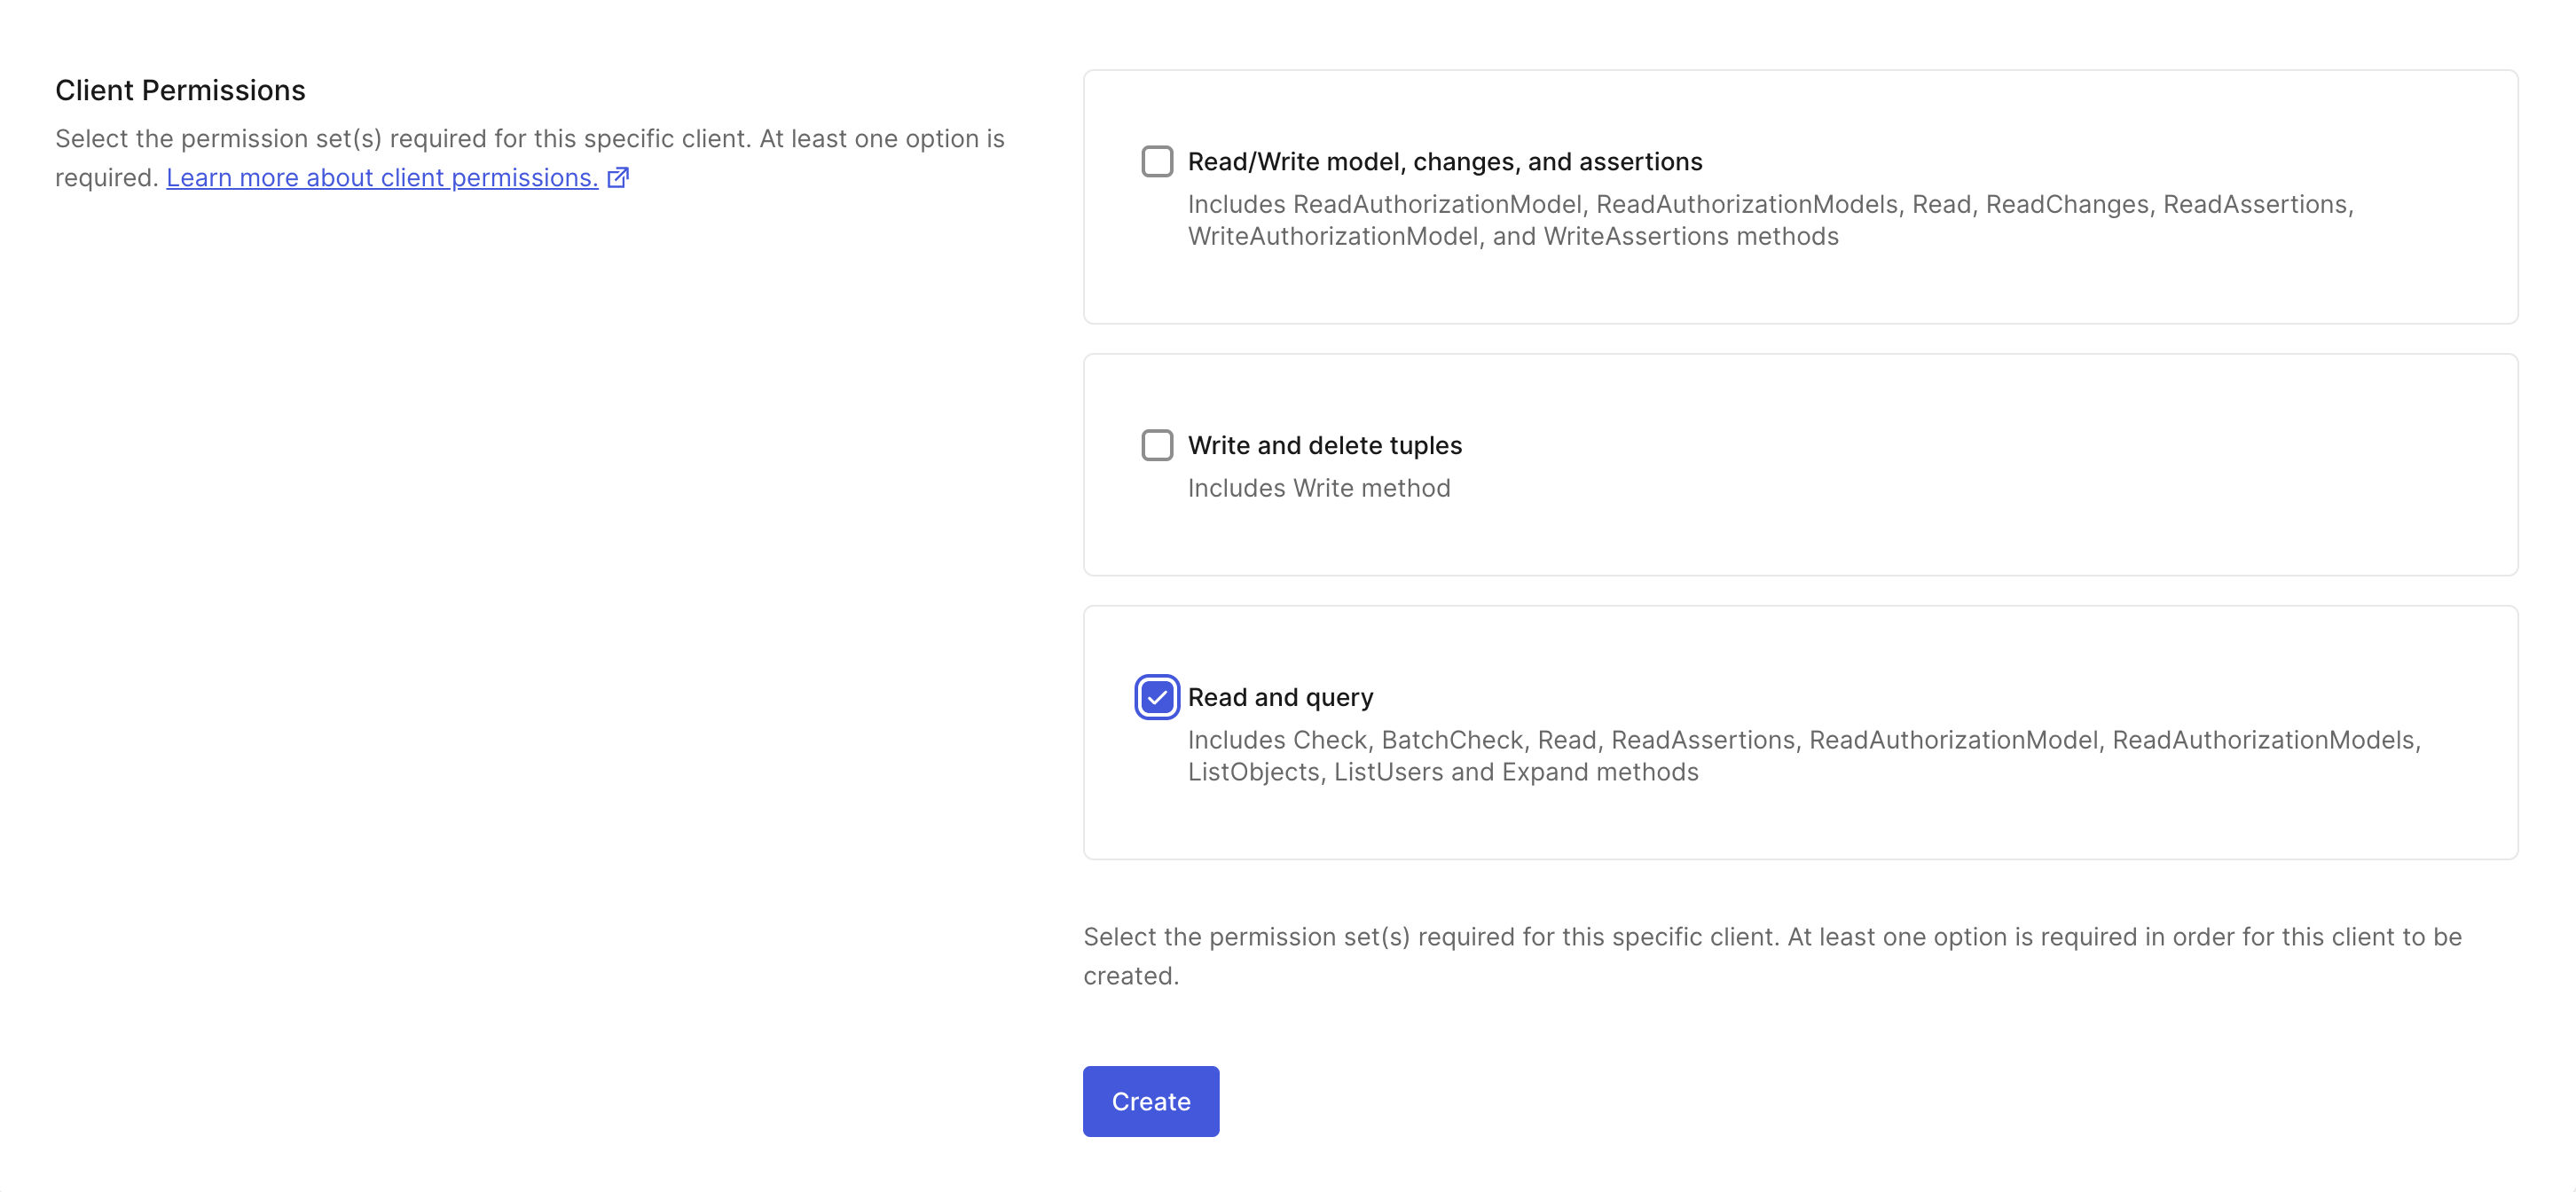
Give your client a name and mark all the client permissions that are
required for your use case. For the quickstart, you'll only need **Read and
query**.
Click **Create**.
Once your client is created, you'll see a modal containing Store ID, Client ID, and Client Secret. Add or update an `.env.local` file with the following content to the root directory of the project. Click **Continue** to see the `FGA_API_URL` and `FGA_API_AUDIENCE.`
The confirmation dialog will provide you with all the information that you need for your environment file.
```bash .env.local wrap lines theme={null}
# You can use any provider of your choice supported by Vercel AI
OPENAI_API_KEY=
# Auth0 FGA
FGA_STORE_ID=
FGA_CLIENT_ID=
FGA_CLIENT_SECRET=
FGA_API_URL=https://api.xxx.fga.dev
FGA_API_AUDIENCE=https://api.xxx.fga.dev/
```
Next, navigate to **Model Explorer**. You'll need to update the model information with this:
```bash wrap lines theme={null}
model
schema 1.1
type user
type doc
relations
define owner: [user]
define viewer: [user, user:*]
```
Remember to click **Save**.
### Secure the RAG Tool
After configuring your FGA Store, secure the RAG tool using Auth0 FGA and Auth0 AI SDK.
The starter application is already configured to handle documents and embeddings.
**Document Upload and Storage**
* You can upload documents through the UI (`src/app/documents/page.tsx`).
* Uploaded documents are processed by the API route (`src/app/api/documents/upload/route.ts`).
* APIs for uploading and retrieving documents are defined in (`src/lib/actions/documents.ts`).
* Database is defined in `src/lib/db`.
* FGA helpers are defined in `src/lib/fga`.
* Documents are stored as embeddings in a vector database for efficient retrieval (`src/lib/rag/embedding.ts`).
**Access Control with Auth0 FGA**
* When a document is uploaded, the app automatically creates [FGA tuples](https://docs.fga.dev/fga-concepts#what-is-a-relationship-tuple) to define which users can access which documents. A tuple signifies a user's relation to a given object. For example, the below tuple implies that all users can view the `` object.
* Navigate to the **Tuple Management** section to see the tuples being added. If you want to add a tuple manually for a document, click **+ Add Tuple**. Fill in the following information:
* **User**: `user:*`
* **Object**: select doc and add `` in the ID field
* **Relation**: `viewer`
#### Create a RAG tool
Define a RAG tool that uses the `FGAFilter` to filter authorized data from the vector database:
```tsx src/lib/tools/context-docs.ts wrap lines theme={null}
import { tool } from "@langchain/core/tools";
import { z } from "zod";
import { FGARetriever } from "@auth0/ai-langchain/RAG";
import { getVectorStore } from "@/lib/rag/embedding";
export const getContextDocumentsTool = tool(
async ({ question }, config) => {
const user = config?.configurable?._credentials?.user;
if (!user) {
return "There is no user logged in.";
}
const vectorStore = await getVectorStore();
if (!vectorStore) {
return "There is no vector store.";
}
const retriever = FGARetriever.create({
retriever: vectorStore.asRetriever(),
buildQuery: (doc) => ({
user: `user:${user?.email}`,
object: `doc:${doc.metadata.documentId}`,
relation: "can_view",
}),
});
// filter docs based on FGA authorization
const documents = await retriever.invoke(question);
return documents.map((doc) => doc.pageContent).join("\n\n");
},
{
name: "get_context_documents",
description:
"Use the tool when user asks for documents or projects or anything that is stored in the knowledge base.",
schema: z.object({
question: z.string().describe("the users question"),
}),
}
);
```
#### Use the RAG tool from AI agent
Call the tool from your AI agent to get data from documents. First, update the `/src/app/api/chat/[..._path]/route.ts` file with the following code to pass the user credentials to your agent:
```ts src/app/api/chat/[..._path]/route.ts wrap lines highlight={3,19,31} theme={null}
import { initApiPassthrough } from "langgraph-nextjs-api-passthrough";
import { getUser, getAccessToken } from "@/lib/auth0";
export const { GET, POST, PUT, PATCH, DELETE, OPTIONS, runtime } =
initApiPassthrough({
apiUrl: process.env.LANGGRAPH_API_URL,
baseRoute: "chat/",
bodyParameters: async (req, body) => {
if (
req.nextUrl.pathname.endsWith("/runs/stream") &&
req.method === "POST"
) {
return {
...body,
config: {
configurable: {
_credentials: {
user: await getUser(),
},
},
},
};
}
return body;
},
headers: async () => {
const accessToken = await getAccessToken();
return {
Authorization: `Bearer ${accessToken}`,
};
},
});
```
Next, add the following code to `src/lib/auth0.ts`:
```tsx src/lib/auth0.ts wrap lines highlight={13-21,23-26} theme={null}
import { Auth0Client } from '@auth0/nextjs-auth0/server';
export const auth0 = new Auth0Client({
authorizationParameters: {
// In v4, the AUTH0_SCOPE and AUTH0_AUDIENCE environment variables are no longer automatically picked up by the SDK.
// Instead, we need to provide the values explicitly.
scope: process.env.AUTH0_SCOPE,
audience: process.env.AUTH0_AUDIENCE,
},
});
// Get the Access token from Auth0 session
export const getAccessToken = async () => {
const tokenResult = await auth0.getAccessToken();
if(!tokenResult || !tokenResult.token) {
throw new Error("No access token found in Auth0 session");
}
return tokenResult.token;
};
export const getUser = async () => {
const session = await auth0.getSession();
return session?.user;
};
```
### Add Custom Authentication
For more information on how to add custom authentication for your LangGraph Platform application, read the [Custom Auth](https://langchain-ai.github.io/langgraphjs/how-tos/auth/custom_auth/) guide.
In your `langgraph.json`, add the path to your auth file:
```typescript langgraph.json wrap lines highlight={8} theme={null}
{
"node_version": "20",
"graphs": {
"agent": "./src/lib/agent.ts:agent"
},
"env": ".env",
"auth": {
"path": "./src/lib/auth.ts:authHandler"
}
}
```
Then, in your `auth.ts` file, add your auth logic:
```typescript src/lib/auth.ts wrap lines theme={null}
import { createRemoteJWKSet, jwtVerify } from "jose";
const { Auth, HTTPException } = require("@langchain/langgraph-sdk/auth");
const AUTH0_DOMAIN = process.env.AUTH0_DOMAIN;
const AUTH0_AUDIENCE = process.env.AUTH0_AUDIENCE;
// JWKS endpoint for Auth0
const JWKS = createRemoteJWKSet(
new URL(`https://${AUTH0_DOMAIN}/.well-known/jwks.json`)
);
// Create the Auth instance
const auth = new Auth();
// Register the authentication handler
auth.authenticate(async (request: Request) => {
const authHeader = request.headers.get("Authorization");
const xApiKeyHeader = request.headers.get("x-api-key");
/**
* LangGraph Platform will convert the `Authorization` header from the client to an `x-api-key` header automatically
* as of now: https://docs.langchain.com/langgraph-platform/custom-auth
*
* We can still leverage the `Authorization` header when served in other infrastructure w/ langgraph-cli
* or when running locally.
*/
// This header is required in Langgraph Cloud.
if (!authHeader && !xApiKeyHeader) {
throw new HTTPException(401, {
message: "Invalid auth header provided.",
});
}
// prefer the xApiKeyHeader first
let token = xApiKeyHeader || authHeader;
// Remove "Bearer " prefix if present
if (token && token.startsWith("Bearer ")) {
token = token.substring(7);
}
// Validate Auth0 Access Token using common JWKS endpoint
if (!token) {
throw new HTTPException(401, {
message:
"Authorization header format must be of the form: Bearer ",
});
}
if (token) {
try {
// Verify the JWT using Auth0 JWKS
const { payload } = await jwtVerify(token, JWKS, {
issuer: `https://${AUTH0_DOMAIN}/`,
audience: AUTH0_AUDIENCE,
});
console.log("✅ Auth0 JWT payload resolved!", payload);
// Return the verified payload - this becomes available in graph nodes
return {
identity: payload.sub!,
email: payload.email as string,
permissions:
typeof payload.scope === "string" ? payload.scope.split(" ") : [],
auth_type: "auth0",
// include the access token for use with Auth0 Token Vault exchanges by tools
getRawAccessToken: () => token,
// Add any other claims you need
...payload,
};
} catch (jwtError) {
console.log(
"Auth0 JWT validation failed:",
jwtError instanceof Error ? jwtError.message : "Unknown error"
);
throw new HTTPException(401, {
message: "Invalid Authorization token provided.",
});
}
}
});
export { auth as authHandler };
```
Now, update the `src/lib/agent.ts` file with the following code to add the tool to your agent:
```ts src/lib/agent.ts wrap lines highlight={1,7} theme={null}
import { getContextDocumentsTool } from "./tools/context-docs";
//... existing code
const tools = [
//... existing tools
getContextDocumentsTool,
];
//... existing code
```
### Test your application
Start the database and create required tables:
```bash wrap lines theme={null}
# start the postgres database
docker compose up -d
# create the database schema
npm run db:migrate
```
Start the application with `npm run all:dev`. Then, navigate to `http://localhost:3000`.
This will open the LangGraph Studio in a new tab. You can close it as we won't
require it for testing the application.
Upload a document from the documents tab and ask your AI agent a question about the document. You should get a response with the relevant information.
Go to an incognito window, log in as a different user, and ask it the same question. You should not get a response.
Share the document from the documents page to the second user and try again. You should see the information now.
That's it! You successfully integrated RAG protected by Auth0 FGA into your project.
Explore [the example app on GitHub](https://github.com/auth0-samples/auth0-ai-samples/tree/main/authorization-for-rag/langchain-next-js).
### Download sample app
Start by downloading and extracting the sample app. Then open in your preferred IDE.
### Install dependencies
In the root directory of your project, install the following dependencies:
* `@auth0/ai-vercel`: [Auth0 AI SDK for Vercel AI](https://github.com/auth0/auth0-ai-js/tree/main/packages/ai-vercel) built for AI agents powered by the Vercel AI SDK.
* `ai`: Core [Vercel AI SDK](https://sdk.vercel.ai/docs) module that interacts with various AI model providers.
* `@ai-sdk/openai`: [OpenAI](https://sdk.vercel.ai/providers/ai-sdk-providers/openai) provider for the Vercel AI SDK.
* `@ai-sdk/react`: [React](https://react.dev/) UI components for the Vercel AI SDK.
* `zod`: TypeScript-first schema validation library.
```bash wrap lines theme={null}
npm install @auth0/ai-vercel@5 ai@6 @ai-sdk/openai@3 @ai-sdk/react@3 zod@3.25.76
```
### Update the environment file
Copy the `.env.example` file to `.env.local` and update the variables with your Auth0 credentials. You can find your Auth0 domain, client ID, and client secret in the application you created in the Auth0 Dashboard.
### Set up an FGA Store
In the [Auth0 FGA dashboard](https://dashboard.fga.dev/):
Navigate to **Settings**. In the **Authorized Clients** section, click **+
Create Client**.
Give your client a name and mark all the client permissions that are
required for your use case. For the quickstart, you'll only need **Read and
query**.
Click **Create**.
Once your client is created, you'll see a modal containing Store ID, Client ID, and Client Secret. Add or update an `.env.local` file with the following content to the root directory of the project. Click **Continue** to see the `FGA_API_URL` and `FGA_API_AUDIENCE.`
The confirmation dialog will provide you with all the information that you need for your environment file.
```bash .env.local wrap lines theme={null}
# You can use any provider of your choice supported by Vercel AI
OPENAI_API_KEY=
# Auth0 FGA
FGA_STORE_ID=
FGA_CLIENT_ID=
FGA_CLIENT_SECRET=
FGA_API_URL=https://api.xxx.fga.dev
FGA_API_AUDIENCE=https://api.xxx.fga.dev/
```
Next, navigate to **Model Explorer**. You'll need to update the model information with this:
```bash wrap lines theme={null}
model
schema 1.1
type user
type doc
relations
define owner: [user]
define viewer: [user, user:*]
```
Remember to click **Save**.
### Secure the RAG Tool
After configuring your FGA Store, secure the RAG tool using Auth0 FGA and Auth0 AI SDK.
The starter application is already configured to handle documents and embeddings.
**Document Upload and Storage**
* You can upload documents through the UI (`src/app/documents/page.tsx`).
* Uploaded documents are processed by the API route (`src/app/api/documents/upload/route.ts`).
* APIs for uploading and retrieving documents are defined in (`src/lib/actions/documents.ts`).
* Database is defined in `src/lib/db`.
* FGA helpers are defined in `src/lib/fga`.
* Documents are stored as embeddings in a vector database for efficient retrieval (`src/lib/rag/embedding.ts`).
**Access Control with Auth0 FGA**
* When a document is uploaded, the app automatically creates [FGA tuples](https://docs.fga.dev/fga-concepts#what-is-a-relationship-tuple) to define which users can access which documents. A tuple signifies a user's relation to a given object. For example, the below tuple implies that all users can view the `` object.
* Navigate to the **Tuple Management** section to see the tuples being added. If you want to add a tuple manually for a document, click **+ Add Tuple**. Fill in the following information:
* **User**: `user:*`
* **Object**: select doc and add `` in the ID field
* **Relation**: `viewer`
#### Create a RAG tool
Define a RAG tool that uses the `FGAFilter` to filter authorized data from the vector database:
```tsx src/lib/tools/context-docs.ts wrap lines theme={null}
import { tool } from "ai";
import { z } from "zod";
import { FGAFilter } from "@auth0/ai";
import { findRelevantContent } from "@/lib/rag/embedding";
import { auth0 } from "../auth0";
export type DocumentWithScore = {
content: string;
documentId: string;
similarity: number;
};
export const getContextDocumentsTool = tool({
description:
"Use the tool when user asks for documents or projects or anything that is stored in the knowledge base.",
parameters: z.object({
question: z.string().describe("the users question"),
}),
execute: async ({ question }) => {
const session = await auth0.getSession();
const user = session?.user;
if (!user) {
return "There is no user logged in.";
}
const retriever = FGAFilter.create({
buildQuery: (doc: DocumentWithScore) => ({
user: `user:${user?.email}`,
object: `doc:${doc.documentId}`,
relation: "can_view",
}),
});
const documents = await findRelevantContent(question, 25);
// filter docs based on FGA authorization
const context = await retriever.filter(documents);
return context;
},
});
```
#### Use the RAG tool from AI agent
Call the tool from your AI agent to get data from documents. Update the `/src/app/api/chat/route.ts` file with the following code:
```ts src/app/api/chat/route.ts wrap lines highlight={2,8} theme={null}
//...
import { getContextDocumentsTool } from "@/lib/tools/context-docs";
//... existing code
export async function POST(req: NextRequest) {
//... existing code
const tools = {
getContextDocumentsTool,
};
return createDataStreamResponse({
execute: async (dataStream: DataStreamWriter) => {
const result = streamText({
model: openai("gpt-4o-mini"),
system: AGENT_SYSTEM_TEMPLATE,
messages,
maxSteps: 5,
tools,
});
result.mergeIntoDataStream(dataStream, {
sendReasoning: true,
});
},
onError: (err: any) => {
console.log(err);
return `An error occurred! ${err.message}`;
},
});
}
```
### Test your application
Start the database and create required tables:
```bash wrap lines theme={null}
# start the postgres database
docker compose up -d
# create the database schema
npm run db:migrate
```
Start the application with `npm run dev`. Then, navigate to `http://localhost:3000`.
Upload a document from the documents tab and ask your AI Agent a question about the document. You should get a response with the relevant information.
Go to an incognito window, log in as a different user, and ask it the same question. You should not get a response.
Share the document from the documents page to the second user and try again. You should see the information now.
That's it! You successfully integrated RAG protected by Auth0 FGA into your project.
Explore [the example app on GitHub](https://github.com/auth0-samples/auth0-ai-samples/tree/main/authorization-for-rag/vercel-ai-next-js).
### Download sample app
Start by downloading and extracting the sample app. Then open in your preferred IDE.
The project is divided into two parts:
* `backend/`: contains the backend code for the Web app and API written in Python using FastAPI and the LangGraph agent.
* `frontend/`: contains the frontend code for the Web app written in React as a Vite SPA.
### Install dependencies
In the `backend` directory of your project, install the following dependencies:
* `auth0-ai-langchain`: [Auth0 AI SDK for LangChain](https://github.com/auth0/auth0-ai-python/tree/main/packages/auth0-ai-langchain) built for AI agents powered by LangChain.
* `langgraph`: [LangGraph](https://pypi.org/project/langgraph/) for building stateful, multi-actor applications with LLMs.
* `langchain-openai`: [OpenAI](https://python.langchain.com/docs/integrations/chat/openai) provider for LangChain.
* `langgraph-cli`: LangGraph CLI for running a local LangGraph server.
* `openfga-sdk`: OpenFGA SDK for Fine-Grained Authorization.
Make sure you have [uv](https://docs.astral.sh/uv/) installed and run the following command to install the dependencies:
```bash wrap lines theme={null}
cd backend
uv sync
uv add "auth0-ai-langchain>=1.0.1" openfga-sdk langgraph langchain-openai "langgraph-cli[inmem]" --prerelease=allow
```
### Update the environment file
Copy the `.env.example` file to `.env` and update the variables with your Auth0 credentials. You can find your Auth0 domain, client ID, and client secret in the application you created in the Auth0 Dashboard.
### Set up an FGA Store
In the [Auth0 FGA dashboard](https://dashboard.fga.dev/):
Navigate to **Settings**. In the **Authorized Clients** section, click **+
Create Client**.
Give your client a name and mark all the client permissions that are
required for your use case. For the quickstart, you'll only need **Read and
query**.
Click **Create**.
Once your client is created, you'll see a modal containing Store ID, Client ID, and Client Secret. Add or update an `.env.local` file with the following content to the root directory of the project. Click **Continue** to see the `FGA_API_URL` and `FGA_API_AUDIENCE.`
The confirmation dialog will provide you with all the information that you need for your environment file.
```bash .env.local wrap lines theme={null}
# You can use any provider of your choice supported by Vercel AI
OPENAI_API_KEY=
# Auth0 FGA
FGA_STORE_ID=
FGA_CLIENT_ID=
FGA_CLIENT_SECRET=
FGA_API_URL=https://api.xxx.fga.dev
FGA_API_AUDIENCE=https://api.xxx.fga.dev/
```
Next, navigate to **Model Explorer**. You'll need to update the model information with this:
```bash wrap lines theme={null}
model
schema 1.1
type user
type doc
relations
define owner: [user]
define viewer: [user, user:*]
```
Remember to click **Save**.
### Secure the RAG tool
After configuring your FGA Store, secure the RAG tool using Auth0 FGA and Auth0 AI SDK.
The starter application is already configured to handle documents and embeddings.
**Document Upload and Storage**
* You can upload documents through the API endpoints (`backend/app/api/routes/documents.py`).
* Uploaded documents are processed and stored with embeddings for efficient retrieval.
* APIs for uploading and retrieving documents are defined in the application routes.
* Database models are defined in `backend/app/models`.
* FGA helpers are implemented in `backend/app/core/fga.py`.
* Documents are stored as embeddings in a PostgreSQL vector database (`backend/app/core/rag.py`).
**Access Control with Auth0 FGA**
* When a document is uploaded, the app automatically creates [FGA tuples](https://docs.fga.dev/fga-concepts#what-is-a-relationship-tuple) to define which users can access which documents. A tuple signifies a user's relation to a given object. For example, the below tuple implies that all users can view the `` object.
* Navigate to the **Tuple Management** section to see the tuples being added. If you want to manually add a tuple for a document, click **+ Add Tuple**. Fill in the following information:
* **User**: `user:*`
* **Object**: select doc and add `` in the ID field
* **Relation**: `viewer`
#### Create a RAG tool
Define a RAG tool that uses the `FGARetriever` to filter authorized data from the vector database:
```python backend/app/agents/tools/context_docs.py wrap lines theme={null}
from langchain_core.runnables import RunnableConfig
from langchain_core.tools import StructuredTool
from auth0_ai_langchain import FGARetriever
from openfga_sdk.client.models import ClientBatchCheckItem
from pydantic import BaseModel
from app.core.rag import get_vector_store
class GetContextDocsSchema(BaseModel):
question: str
async def get_context_docs_fn(question: str, config: RunnableConfig):
"""Use the tool when user asks for documents or projects or anything that is stored in the knowledge base"""
if "configurable" not in config or "_credentials" not in config["configurable"]:
return "There is no user logged in."
credentials = config["configurable"]["_credentials"]
user = credentials.get("user")
if not user:
return "There is no user logged in."
user_email = user.get("email")
vector_store = await get_vector_store()
if not vector_store:
return "There is no vector store."
retriever = FGARetriever(
retriever=vector_store.as_retriever(),
build_query=lambda doc: ClientBatchCheckItem(
user=f"user:{user_email}",
object=f"doc:{doc.metadata.get('document_id')}",
relation="can_view",
),
)
documents = retriever.invoke(question)
return "\n\n".join([document.page_content for document in documents])
get_context_docs = StructuredTool(
name="get_context_docs",
description="Use the tool when user asks for documents or projects or anything that is stored in the knowledge base",
args_schema=GetContextDocsSchema,
coroutine=get_context_docs_fn,
)
```
#### Use the RAG tool from AI agent
Call the tool from your AI agent to get data from documents. First, update the `backend/app/api/routes/chat.py` file with the following code to pass the user credentials to your agent:
```python backend/app/api/routes/chat.py wrap lines highlight={2,9,21} theme={null}
# ...
from app.core.auth import auth_client
# ...
@agent_router.api_route(
"/{full_path:path}", methods=["GET", "POST", "DELETE", "PATCH", "PUT", "OPTIONS"]
)
async def api_route(
request: Request, full_path: str, auth_session=Depends(auth_client.require_session)
):
try:
# ... existing code
# Prepare body
body = await request.body()
if request.method in ("POST", "PUT", "PATCH") and body:
content = await request.json()
content["config"] = {
"configurable": {
"_credentials": {
"user": auth_session.get("user"),
}
}
}
body = json.dumps(content).encode("utf-8")
# ... existing code
```
Now, update the `backend/app/agents/assistant0.py` file with the following code to add the tool to your agent:
```python backend/app/agents/assistant0.py wrap lines highlight={2,4} theme={null}
# ...
from app.agents.tools.context_docs import get_context_docs
tools = [get_context_docs]
llm = ChatOpenAI(model="gpt-4.1-mini")
# ... existing code
agent = create_react_agent(
llm,
tools=ToolNode(tools, handle_tool_errors=False),
prompt=get_prompt(),
)
```
### Test your application
To test the application, start the database, FastAPI backend, LangGraph server, and the frontend:
1. Start the FastAPI backend:
```bash wrap lines theme={null}
cd backend
# start the postgres database
docker compose up -d
# start the FastAPI backend
source .venv/bin/activate
fastapi dev app/main.py
```
2. In another terminal, start the LangGraph server:
```bash wrap lines theme={null}
cd backend
source .venv/bin/activate
uv pip install -U langgraph-api
langgraph dev --port 54367 --allow-blocking
```
This will open the LangGraph Studio in a new tab. You can close it as we won't
require it for testing the application.
3. In another terminal, start the frontend:
```bash wrap lines theme={null}
cd frontend
cp .env.example .env # Copy the `.env.example` file to `.env`.
npm install
npm run dev
```
Visit the URL `http://localhost:5173` in your browser.
Upload a document from the documents tab and ask your AI agent a question about the document. You should get a response with the relevant information.
Go to an incognito window, log in as a different user, and ask it the same question. You should not get a response.
Share the document from the documents page to the second user and try again. You should see the information now.
That's it! You successfully integrated RAG protected by Auth0 FGA into your project.
Explore [the example app on GitHub](https://github.com/auth0-samples/auth0-ai-samples/tree/main/authorization-for-rag/langchain-fastapi-py).
### Install dependencies
As a first step, let's get all dependencies installed:
```bash Create a new Node.js project wrap lines theme={null}
npm init -y
npm install langchain@0.3 @langchain/langgraph@0.2 @auth0/ai-langchain@4 dotenv@16
```
### Set up an FGA Store
In the [Auth0 FGA dashboard](https://dashboard.fga.dev/):
Navigate to **Settings**. In the **Authorized Clients** section, click **+
Create Client**.
Give your client a name and mark all the client permissions that are
required for your use case. For the quickstart, you'll only need **Read and
query**.
Click **Create**.
Once your client is created, you'll see a modal containing Store ID, Client ID, and Client Secret. Add or update an `.env.local` file with the following content to the root directory of the project. Click **Continue** to see the `FGA_API_URL` and `FGA_API_AUDIENCE.`
The confirmation dialog will provide you with all the information that you need for your environment file.
```bash .env.local wrap lines theme={null}
# You can use any provider of your choice supported by Vercel AI
OPENAI_API_KEY=
# Auth0 FGA
FGA_STORE_ID=
FGA_CLIENT_ID=
FGA_CLIENT_SECRET=
FGA_API_URL=https://api.xxx.fga.dev
FGA_API_AUDIENCE=https://api.xxx.fga.dev/
```
Next, navigate to **Model Explorer**. You'll need to update the model information with this:
```bash wrap lines theme={null}
model
schema 1.1
type user
type doc
relations
define owner: [user]
define viewer: [user, user:*]
```
Remember to click **Save**.
Now, to access public information, you'll need to add a tuple on FGA. Navigate to the **Tuple Management** section and click **+ Add Tuple**. Fill in the following information:
* **User**: `user:*`
* **Object**: select doc and add `public-doc` in the ID field
* **Relation**: `viewer`
A tuple signifies a user's relation to a given object. For example, the above tuple implies that all users can view the `public-doc` object.
### Secure the RAG Tool
After configuring your FGA Store, let’s get back to our node.js project. There you’ll secure the RAG tool using [Auth0 FGA](https://auth0.com/fine-grained-authorization) and [Auth0 AI SDK](https://github.com/auth0/auth0-ai-python).
### Get the Assets
Create an `assets` folder and download the below files into the folder:
* [`public-doc.md`](https://raw.githubusercontent.com/auth0-samples/auth0-ai-samples/refs/heads/main/authorization-for-rag/langgraph-agentic-js/assets/docs/public-doc.md)
* [`private-doc.md`](https://raw.githubusercontent.com/auth0-samples/auth0-ai-samples/refs/heads/main/authorization-for-rag/langgraph-agentic-js/assets/docs/private-doc.md)
### Create helper functions
Create a LangGraph agent and other helper functions that are needed to load documents.
The first helper will create an in-memory vector store using `faiss` and `OpenAIEmbeddings`. You can replace this module with your own store, as long as it follows the LangChain retriever specification.
```ts helpers.ts wrap lines theme={null}
import fs from "node:fs/promises";
import { StructuredToolInterface } from "@langchain/core/tools";
import { createReactAgent } from "@langchain/langgraph/prebuilt";
import { ChatOpenAI } from "@langchain/openai";
import { Document } from "@langchain/core/documents";
export class RetrievalAgent {
private agent;
private constructor(agent) {
this.agent = agent;
}
// Create a retrieval agent with a retriever tool and a language model
static create(tools: StructuredToolInterface[]) {
// Create a retrieval agent that has access to the retrieval tool.
const retrievalAgent = createReactAgent({
llm: new ChatOpenAI({ temperature: 0, model: "gpt-4o-mini" }),
tools,
stateModifier: [
"Answer the user's question only based on context retrieved from provided tools.",
"Only use the information provided by the tools.",
"If you need more information, ask for it.",
].join(" "),
});
return new RetrievalAgent(retrievalAgent);
}
// Query the retrieval agent with a user question
async query(query: string) {
const { messages } = await this.agent.invoke({
messages: [
{
role: "user",
content: query,
},
],
});
return messages.at(-1)?.content;
}
}
async function readDoc(path: string) {
return await fs.readFile(path, "utf-8");
}
/* Reads documents from the assets folder and converts them to langChain Documents */
export async function readDocuments() {
const folderPath = "./assets";
const files = await fs.readdir(folderPath);
const documents: Document[] = [];
for (const file of files) {
documents.push(
new Document({
pageContent: await readDoc(`${folderPath}/${file}`),
metadata: { id: file.slice(0, file.lastIndexOf(".")) },
})
);
}
return documents;
}
```
### Create a RAG Pipeline
Define a RAG tool that uses the `FGARetriever` to filter authorized data from an in-memory vector database.
In the first step, we will define a new RAG tool. The agent calls the tool when needed.
```ts index.ts wrap lines theme={null}
import "dotenv/config";
import { OpenAIEmbeddings } from "@langchain/openai";
import { MemoryVectorStore } from "langchain/vectorstores/memory";
import { FGARetriever } from "@auth0/ai-langchain/RAG";
import { readDocuments, RetrievalAgent } from "./helpers";
async function main() {
console.info(
"\n..:: LangGraph Agents Example: Agentic Retrieval with Auth0 FGA \n\n"
);
const user = "user1";
// 1. Read and load documents from the assets folder
const documents = await readDocuments();
// 2. Create an in-memory vector store from the documents for OpenAI models.
const vectorStore = await MemoryVectorStore.fromDocuments(
documents,
new OpenAIEmbeddings({ model: "text-embedding-3-small" })
);
// 3. Create a retriever that uses FGA to gate fetching documents on permissions.
const retriever = FGARetriever.create({
retriever: vectorStore.asRetriever(),
// FGA tuple to query for the user's permissions
buildQuery: (doc) => ({
user: `user:${user}`,
object: `doc:${doc.metadata.id}`,
relation: "viewer",
}),
});
// 4. Convert the retriever into a tool for an agent.
const fgaTool = retriever.asJoinedStringTool();
// 5. The agent will call the tool, rephrasing the original question and
// populating the "query" argument, until it can answer the user's question.
const retrievalAgent = RetrievalAgent.create([fgaTool]);
// 6. Query the retrieval agent with a prompt
const answer = await retrievalAgent.query("Show me forecast for ZEKO?");
console.info(answer);
}
main().catch(console.error);
```
### Run the application
To run the application, add the below to `package.json`:
```json package.json wrap lines theme={null}
"x-type": "module",
"main": "index.js",
"scripts": {
"start": "npx tsx index.ts"
},
```
Run the application using `npm start`, and the agent will respond that it cannot find the required information.
The application can retrieve the information if you change the query to something available in the public document.
Now, to access the private information, you’ll need to update your tuple list. Go back to the Okta FGA dashboard in the **Tuple Management** section and click **+ Add Tuple**. Fill in the following information:
* **User**: `user:user1`
* **Object**: select doc and add `private-doc` in the ID field
* **Relation**: `viewer`
Now, click **Add Tuple** and then run `npm start` again. This time, you should see a response containing the forecast information since you added a tuple that defines the `viewer` relation for `user1` to the `private-doc` object.
Explore [the example app on GitHub](https://github.com/auth0-samples/auth0-ai-samples/tree/main/authorization-for-rag/langgraph-agentic-js).
### Install dependencies
Please use [Python version >=3.11 and \<4.0](https://www.python.org/downloads/).
As a first step, let's create a virtual environment and install the dependencies:
```bash wrap lines theme={null}
# Create a virtual env
python -m venv venv
# Activate the virtual env
source ./venv/bin/activate
# Install dependencies
pip install langgraph langchain-openai python-dotenv faiss-cpu langchain-community auth0-ai-langchain langgraph-prebuilt
```
### Set up an FGA Store
In the [Auth0 FGA dashboard](https://dashboard.fga.dev/):
Navigate to **Settings**. In the **Authorized Clients** section, click **+
Create Client**.
Give your client a name and mark all the client permissions that are
required for your use case. For the quickstart, you'll only need **Read and
query**.
Click **Create**.
Once your client is created, you'll see a modal containing Store ID, Client ID, and Client Secret. Add or update an `.env.local` file with the following content to the root directory of the project. Click **Continue** to see the `FGA_API_URL` and `FGA_API_AUDIENCE.`
The confirmation dialog will provide you with all the information that you need for your environment file.
```bash .env.local wrap lines theme={null}
# You can use any provider of your choice supported by Vercel AI
OPENAI_API_KEY=
# Auth0 FGA
FGA_STORE_ID=
FGA_CLIENT_ID=
FGA_CLIENT_SECRET=
FGA_API_URL=https://api.xxx.fga.dev
FGA_API_AUDIENCE=https://api.xxx.fga.dev/
```
Next, navigate to **Model Explorer**. You'll need to update the model information with this:
```bash wrap lines theme={null}
model
schema 1.1
type user
type doc
relations
define owner: [user]
define viewer: [user, user:*]
```
Remember to click **Save**.
Now, to access public information, you'll need to add a tuple on FGA. Navigate to the **Tuple Management** section and click **+ Add Tuple**. Fill in the following information:
* **User**: `user:*`
* **Object**: select doc and add `public-doc` in the ID field
* **Relation**: `viewer`
A tuple signifies a user's relation to a given object. For example, the above tuple implies that all users can view the `public-doc` object.
### Secure the RAG Tool
After all this configuration, let's get back to our node.js project. There you'll secure the RAG tool using [Auth0 FGA](https://auth0.com/fine-grained-authorization) and [Auth0 AI SDK](https://github.com/auth0/auth0-ai-python).
### Get the assets
Create an `assets` folder and download the below files into the folder:
* [`public-doc.md`](https://raw.githubusercontent.com/auth0-samples/auth0-ai-samples/refs/heads/main/authorization-for-rag/langgraph-agentic-js/assets/docs/public-doc.md)
* [`private-doc.md`](https://raw.githubusercontent.com/auth0-samples/auth0-ai-samples/refs/heads/main/authorization-for-rag/langgraph-agentic-js/assets/docs/private-doc.md)
### Create helper functions
Create a LangGraph agent and other helper functions that are needed to load documents.
The first helper will create an in-memory vector store using `faiss` and `OpenAIEmbeddings`. You can replace this module with your own store, as long as it follows the LangChain retriever specification.
```py helpers/memory_store.py wrap lines theme={null}
import faiss
from langchain_openai import OpenAIEmbeddings
from langchain_community.docstore import InMemoryDocstore
from langchain_community.vectorstores import FAISS
class MemoryStore:
def __init__(self, store):
self.store = store
@classmethod
def from_documents(cls, documents):
embedding_model = OpenAIEmbeddings(model="text-embedding-ada-002")
index = faiss.IndexFlatL2(1536)
docstore = InMemoryDocstore({})
index_to_docstore_id = {}
vector_store = FAISS(embedding_model, index, docstore, index_to_docstore_id)
vector_store.add_documents(documents)
return cls(vector_store)
def as_retriever(self):
return self.store.as_retriever()
```
The second helper will load the documents from the assets folder into the store.
```py helpers/read_documents.py wrap lines theme={null}
import os
from langchain_core.documents import Document
def read_documents():
current_dir = os.path.dirname(__file__)
public_doc_path = os.path.join(current_dir, "../docs/public-doc.md")
private_doc_path = os.path.join(current_dir, "../docs/private-doc.md")
with open(public_doc_path, "r", encoding="utf-8") as file:
public_doc_content = file.read()
with open(private_doc_path, "r", encoding="utf-8") as file:
private_doc_content = file.read()
documents = [
Document(
page_content=public_doc_content,
metadata={"id": "public-doc", "access": "public"},
),
Document(
page_content=private_doc_content,
metadata={"id": "private-doc", "access": "private"},
),
]
return documents
```
### Create a RAG Pipeline
Define a RAG tool that uses the `FGARetriever` to filter authorized data from an in-memory vector database.
In the first step, we will define a new RAG tool. The agent will call up the tool when needed.
```py main.py wrap lines theme={null}
@tool
def agent_retrieve_context_tool(query: str):
"""Call to get information about a company, e.g., What is the financial outlook for ZEKO?"""
documents = read_documents()
vector_store = MemoryStore.from_documents(documents)
user_id = "admin"
retriever = FGARetriever(
retriever=vector_store.as_retriever(),
build_query=lambda doc: ClientBatchCheckItem(
user=f"user:{user_id}",
object=f"doc:{doc.metadata.get('id')}",
relation="viewer",
),
)
relevant_docs = retriever.invoke(query)
if len(relevant_docs) > 0:
return "\n\n".join([doc.page_content for doc in relevant_docs])
return "I don't have any information on that."
tools = [agent_retrieve_context_tool]
```
The `FGARetriever` defined in the `retrieve` node is designed to abstract the base retriever from the FGA query logic. In this case, the `build_query` argument lets us specify how to query our FGA model by asking if the user is a viewer of the document.
```py main.py wrap lines theme={null}
# ...
build_query=lambda doc: ClientBatchCheckItem(
user=f"user:{user_id}",
object=f"doc:{doc.metadata.get('id')}",
relation="viewer",
),
```
Next, we define the reactive agent nodes, as seen in the file below. Please refer to the comments to see explanations of the steps:
```py main.py wrap lines theme={null}
# ...
def agent_node(state: State):
"""
Generate the response from the agent.
"""
llm_response = llm.invoke(state["messages"])
return {"messages": [llm_response]}
def agent_should_continue(state: State):
"""
Determines whether the conversation should continue based on the user input.
"""
last_message = state["messages"][-1]
if last_message.tool_calls:
return "tools"
return END
def generate_response_node(state: State):
"""
Generate the response from the agent based on the result of the RAG tool.
"""
prompt = PromptTemplate(
template="""You are an assistant for question-answering tasks. Use the following pieces of retrieved-context to answer the question. If you don't know the answer, just say that you don't know. Use three sentences maximum and keep the answer concise. Question: {question}. Context: {context}. Answer:""",
input_variables=["question", "context"],
)
question = state["messages"][0].content
context = state["messages"][-1].content
chain = prompt | llm
llm_response = chain.invoke(
{"question": question, "context": context}, prompt=prompt
)
return {"messages": [llm_response]}
```
And finally, we build the graph.
```py main.py wrap lines theme={null}
# ...
# Create the OpenAI chat tool
llm = ChatOpenAI(model="gpt-4o-mini").bind_tools(tools)
# Build the graph
graph_builder = StateGraph(State)
tool_node = ToolNode(tools)
# Define the nodes
graph_builder.add_node("agent", agent_node)
graph_builder.add_node("tools", tool_node)
graph_builder.add_node("generate_response", generate_response_node)
# Run the graph
result = graph.invoke(
{"messages": [("human", "What is the financial outlook for ZEKO?")]}
)
print(result["messages"][-1].content)
```
### Run the application
To run the application, simply run the Python script as follows:
```bash wrap lines theme={null}
python main.py
```
The application can retrieve the information if you change the query to something available in the public document. Now, to access the private information, you'll need to update your tuple list. Go back to the Auth0 FGA dashboard in the **Tuple Management** section and click **+ Add Tuple**. Fill in the following information:
* **User**: `user:user1`
* **Object**: select doc and add `private-doc` in the ID field
* **Relation**: `viewer`
Now, click **Add Tuple** and then run `npm start` again. This time, you should see a response containing the forecast information since you added a tuple that defines the `viewer` relation for `user1` to the `private-doc` object.
## Next steps
* [Authorization for RAG docs](/intro/authorization-for-rag)
* Learn how to use [Auth0 FGA](https://auth0.com/fine-grained-authorization) to create a Relationship-Based Access Control (ReBAC) authorization model.
* Learn more about [OpenFGA](https://openfga.dev/docs/fga).