> ## Documentation Index
> Fetch the complete documentation index at: https://auth0.com/ai/docs/llms.txt
> Use this file to discover all available pages before exploring further.
# Asynchronous Authorization
> Learn how Auth0 for AI Agents enables AI agents to asynchronously authorize users.
export const DownloadQuickstartButton = ({category, framework, label = "Download Sample"}) => {
const [isDownloading, setIsDownloading] = useState(false);
const githubRepo = 'auth0-samples/auth0-ai-samples';
const filename = `${category}-${framework}-sample.zip`;
const downloadSample = () => {
setIsDownloading(true);
const downloadUrl = `https://github.com/${githubRepo}/releases/latest/download/${filename}`;
window.open(downloadUrl, '_blank');
setTimeout(() => setIsDownloading(false), 1000);
};
return
;
};
export const AccountAndAppSteps = ({applicationType = "Regular Web Applications", callbackUrl = "http://localhost:3000/auth/callback", logoutUrl = "http://localhost:3000", appCreation = true, allowedWebOrigins, copyDomain, enableTokenVaultGrant = false, enableRefreshTokenGrant = false, enableAllowRefreshTokenRotation = undefined}) => {
const steps = [
To continue with this quickstart, you need to have an{" "}
Auth0 account.
];
if (appCreation) {
steps.push(
Go to your{" "}
Auth0 Dashboard
{" "}
to create a new Auth0 Application.
Scroll down to the Refresh Token Rotation section and {enableAllowRefreshTokenRotation === true ? "enable" : "disable"} the Allow Refresh Token Rotation option.
In your Auth0 Dashboard, go to{" "}
Applications > APIs.
Create a new API with an identifier (audience).
Once API is created, go to the APIs{" "}
Settings > Access Settings and enable{" "}
Allow Offline Access.
Note down the API identifier for your environment variables.
To learn more about Auth0 APIs, read{" "}
APIs
.
);
}
steps.push(
Enable the CIBA Grant for your Auth0 Application. Go to{" "}
Applications > [Your Application] > Settings > Advanced >
Grant Types
{" "}
and enable the{" "}
Client Initiated Backchannel Authentication (CIBA) grant
type.
,
Configure the notification channels (such as email or push notifications) for your Auth0 Application. Go to{" "}
Applications > [Your Application] > Settings > Client-Initiated Backchannel Authentication (CIBA) section >
{" "}
and enable the{" "} notification channel(s) to use with the asynchronous authorization requests for this application.
To learn more about configuring notification channels and using the requested expiry setting, read the {" "}
Asynchronous Authorization
{" "} documentation.
,
Enable Mutli-factor authentication (MFA) with Guardian Push Notifications
for your Auth0 tenant. To learn more about MFA with Guardian, read the{" "}
Auth0 Guardian documentation
.
,
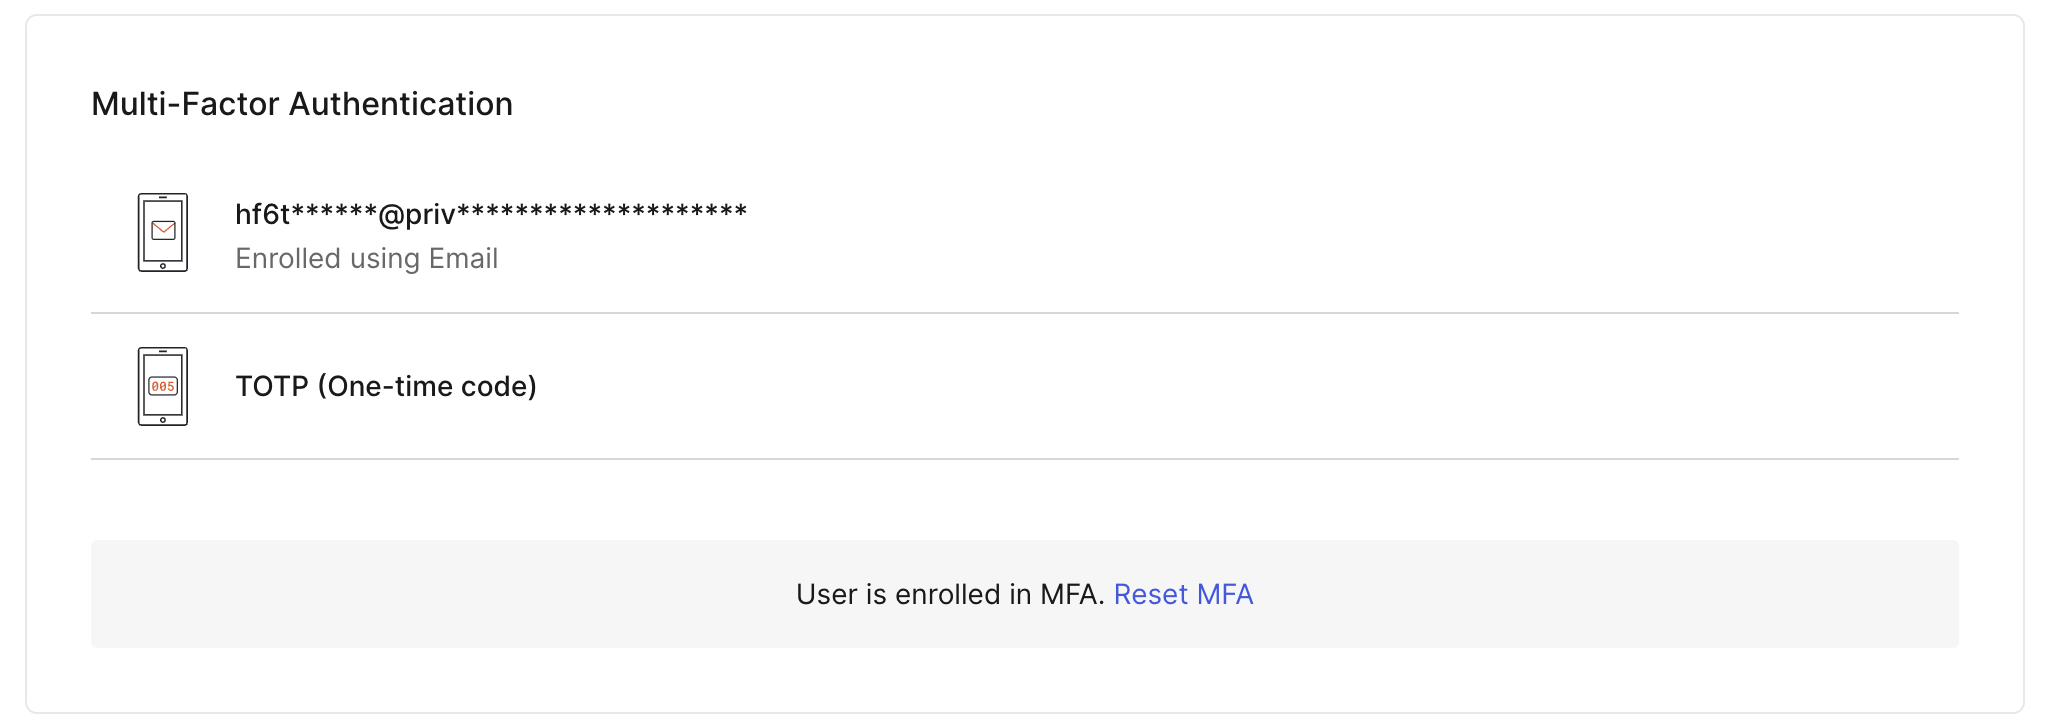
To initiate a CIBA push request, the authorizing user must be enrolled in
MFA using push notifications. To verify if the authorizing user is
enrolled for MFA push notifications in the{" "}
Auth0 Dashboard
, navigate to User Management > Users and click on the
user. Under Multi-Factor Authentication, Auth0 lists the
factors the user is enrolled in:
If the user is not enrolled, you can send an enrollment request by email:
,
Set up an{" "}
OpenAI account and API key
.
);
return <>
Prerequisites
Before getting started, make sure you have completed the following steps:
{steps}
;
};
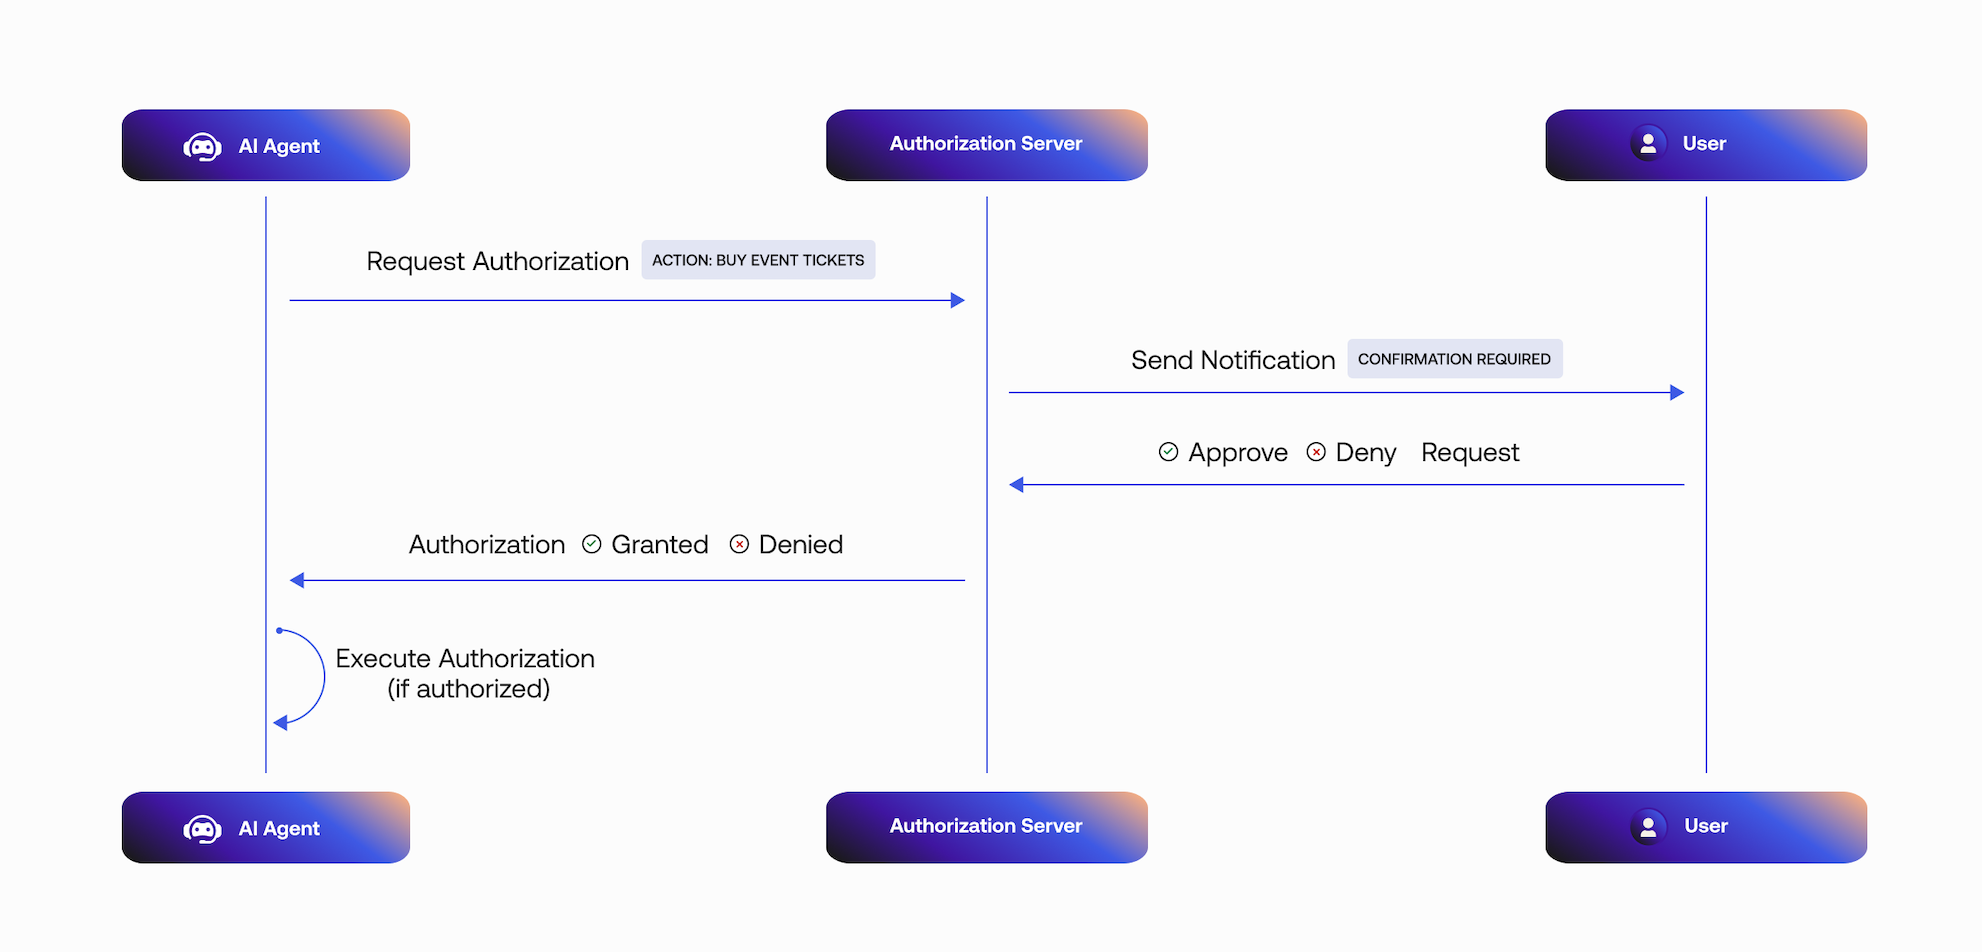
Auth0 for AI Agents enables AI agents to asynchronously authorize users using the [Client-Initiated Backchannel Authentication Flow (CIBA)](https://auth0.com/docs/get-started/authentication-and-authorization-flow/client-initiated-backchannel-authentication-flow). AI agents can work in the background, only notifying the user when needed for critical actions.
When you add secure [human-in-the-loop approvals](https://sdk.vercel.ai/cookbook/next/human-in-the-loop) to your AI agent workflows, you can use Auth0 to request the user's permission to complete an authorization request. The AI agent can render [rich authorization data](https://auth0.com/docs/get-started/authentication-and-authorization-flow/client-initiated-backchannel-authentication-flow/user-authorization-with-ciba) in the consent prompt so the user knows exactly what they're authorizing.
By the end of this quickstart, you should have an AI agent integrated with the [Auth0 AI SDK](https://github.com/auth0/auth0-ai-js) that can request to buy products from an online shop on the user's behalf.
## Pick your tech stack
### Download sample app
Start by downloading and extracting the sample app. Then open in your preferred IDE.
### Install dependencies
In the root directory of your project, install the following dependencies:
* `@auth0/ai-langchain`: [Auth0 AI SDK for LangChain](https://github.com/auth0/auth0-ai-js/tree/main/packages/ai-langchain) built for AI agents powered by LangChain.
* `@langchain/langgraph`: For building stateful, multi-actor applications with LLMs.
* `langchain`: The LangChain library.
* `@langchain/core`: LangChain core libraries.
* `@langchain/openai`: OpenAI provider for LangChain.
* `langgraph-nextjs-api-passthrough`: API passthrough for LangGraph.
```bash wrap lines theme={null}
npm install @auth0/ai-langchain@4 @langchain/core@0.3.77 @langchain/langgraph@0.4.9 @langchain/openai@0.6.13 langchain@0.3.33 langgraph-nextjs-api-passthrough@0.1.4
```
### Update the environment file
Copy the `.env.example` file to `.env.local` and update the variables with your Auth0 credentials. You can find your Auth0 domain, client ID, and client secret in the application you created in the Auth0 Dashboard.
### Set up Human-in-the-Loop approvals
Integrate the Auth0 AI SDK into your application to secure your async AI agent workflow. For this quickstart, we will use a blocking request flow. In real use cases, often an asynchronous flow is preferred.
#### Configure the Auth0 AI SDK
To require asynchronous authorization for your tool, the tool needs to be wrapped with the Async authorizer, `withAsyncAuthorization()`. Let's create a helper function to wrap the tool with the Async authorizer.
Create a file at `src/lib/auth0-ai.ts` and instantiate a new Auth0 AI SDK client:
```tsx src/lib/auth0-ai.ts wrap lines theme={null}
import { Auth0AI } from "@auth0/ai-langchain";
import { AccessDeniedInterrupt } from "@auth0/ai/interrupts";
const auth0AI = new Auth0AI();
// Async Authorization flow for user confirmation
export const withAsyncAuthorization = auth0AI.withAsyncAuthorization({
userID: async (_params, config) => {
return config.configurable?.langgraph_auth_user?.sub;
},
bindingMessage: async ({ product, qty }) =>
`Do you want to buy ${qty} ${product}`,
scopes: ["openid", "product:buy"], // add any scopes you want to use with your API
audience: process.env["SHOP_API_AUDIENCE"]!,
/**
* Controls how long the authorization request is valid for.
*/
// requestedExpiry: 301,
/**
* The behavior when the authorization request is made.
*
* - `block`: The tool execution is blocked until the user completes the authorization.
* - `interrupt`: The tool execution is interrupted until the user completes the authorization.
* - a callback: Same as "block" but give access to the auth request and executing logic.
*
* Defaults to `interrupt`.
*
* When this flag is set to `block`, the execution of the tool awaits
* until the user approves or rejects the request.
* Given the asynchronous nature of the CIBA flow, this mode
* is only useful during development.
*
* In practice, the process that is awaiting the user confirmation
* could crash or timeout before the user approves the request.
*/
onAuthorizationRequest: async (authReq, creds) => {
console.log(`An authorization request was sent to your mobile device.`);
await creds;
console.log(`Thanks for approving the order.`);
},
onUnauthorized: async (e: Error) => {
if (e instanceof AccessDeniedInterrupt) {
return "The user has denied the request";
}
return e.message;
},
});
```
This will intercept the tool call to initiate a Async Authorization request:
* The Async Authorization request includes the user ID that will approve the request.
* Auth0 sends the user a mobile push notification. The AI agent polls the `/token` endpoint for a user response.
* The mobile application retrieves the `bindingMessage` containing the consent details, in this case, the details of the product to purchase.
* The user responds to the request:
* If the request is approved, the tool execution will continue.
* If the request is rejected, the tool execution will not continue.
#### Pass credentials to the tools
Next, add the following code to `src/lib/auth0.ts`:
```tsx src/lib/auth0.ts wrap lines highlight={12-20} theme={null}
//... existing code
export const auth0 = new Auth0Client({
authorizationParameters: {
// In v4, the AUTH0_SCOPE and AUTH0_AUDIENCE environment variables are no longer automatically picked up by the SDK.
// Instead, we need to provide the values explicitly.
scope: process.env.AUTH0_SCOPE,
audience: process.env.AUTH0_AUDIENCE,
},
});
// Get the Access token from Auth0 session
export const getAccessToken = async () => {
const tokenResult = await auth0.getAccessToken();
if(!tokenResult || !tokenResult.token) {
throw new Error("No access token found in Auth0 session");
}
return tokenResult.token;
};
```
Update the `/src/app/api/chat/[..._path]/route.ts` file with the following code. The access token will be passed to your LangGraph agent so we can use it from the Auth0 AI SDK to get the current user.
```ts src/app/api/chat/[..._path]/route.ts wrap lines highlight={3,9-13} theme={null}
import { initApiPassthrough } from "langgraph-nextjs-api-passthrough";
import { getAccessToken } from "@/lib/auth0";
export const { GET, POST, PUT, PATCH, DELETE, OPTIONS, runtime } =
initApiPassthrough({
apiUrl: process.env.LANGGRAPH_API_URL,
baseRoute: "chat/",
headers: async () => {
const accessToken = await getAccessToken();
return {
Authorization: `Bearer ${accessToken}`,
};
});
```
### Add Custom Authentication
For more information on how to add custom authentication for your LangGraph Platform application, read the [Custom Auth](https://langchain-ai.github.io/langgraphjs/how-tos/auth/custom_auth/) guide.
In your `langgraph.json`, add the path to your auth file:
```typescript langgraph.json wrap lines highlight={8} theme={null}
{
"node_version": "20",
"graphs": {
"agent": "./src/lib/agent.ts:agent"
},
"env": ".env",
"auth": {
"path": "./src/lib/auth.ts:authHandler"
}
}
```
Then, in your auth.ts file, add your auth logic:
```typescript src/lib/auth.ts wrap lines theme={null}
import { createRemoteJWKSet, jwtVerify } from "jose";
const { Auth, HTTPException } = require("@langchain/langgraph-sdk/auth");
const AUTH0_DOMAIN = process.env.AUTH0_DOMAIN;
const AUTH0_AUDIENCE = process.env.AUTH0_AUDIENCE;
// JWKS endpoint for Auth0
const JWKS = createRemoteJWKSet(
new URL(`https://${AUTH0_DOMAIN}/.well-known/jwks.json`)
);
// Create the Auth instance
const auth = new Auth();
// Register the authentication handler
auth.authenticate(async (request: Request) => {
const authHeader = request.headers.get("Authorization");
const xApiKeyHeader = request.headers.get("x-api-key");
/**
* LangGraph Platform will convert the `Authorization` header from the client to an `x-api-key` header automatically
* as of now: https://docs.langchain.com/langgraph-platform/custom-auth
*
* We can still leverage the `Authorization` header when served in other infrastructure w/ langgraph-cli
* or when running locally.
*/
// This header is required in Langgraph Cloud.
if (!authHeader && !xApiKeyHeader) {
throw new HTTPException(401, {
message: "Invalid auth header provided.",
});
}
// prefer the xApiKeyHeader first
let token = xApiKeyHeader || authHeader;
// Remove "Bearer " prefix if present
if (token && token.startsWith("Bearer ")) {
token = token.substring(7);
}
// Validate Auth0 Access Token using common JWKS endpoint
if (!token) {
throw new HTTPException(401, {
message:
"Authorization header format must be of the form: Bearer ",
});
}
if (token) {
try {
// Verify the JWT using Auth0 JWKS
const { payload } = await jwtVerify(token, JWKS, {
issuer: `https://${AUTH0_DOMAIN}/`,
audience: AUTH0_AUDIENCE,
});
console.log("✅ Auth0 JWT payload resolved!", payload);
// Return the verified payload - this becomes available in graph nodes
return {
identity: payload.sub!,
email: payload.email as string,
permissions:
typeof payload.scope === "string" ? payload.scope.split(" ") : [],
auth_type: "auth0",
// include the access token for use with Auth0 Token Vault exchanges by tools
getRawAccessToken: () => token,
// Add any other claims you need
...payload,
};
} catch (jwtError) {
console.log(
"Auth0 JWT validation failed:",
jwtError instanceof Error ? jwtError.message : "Unknown error"
);
throw new HTTPException(401, {
message: "Invalid Authorization token provided.",
});
}
}
});
export { auth as authHandler };
```
#### Create a tool to call your API
In this example, we use a tool that buys products on the user's behalf. When the user approves the transaction, the Auth0 AI SDK retrieves an access token to call the shop's API. Upon completing the Async Authorization flow, the AI agent responds with a message confirming the purchase. The Auth0 AI SDK returns an error response if the user denies the transaction.
Now, create a file `src/lib/tools/shop-online.ts` and add the following code:
```ts src/lib/tools/shop-online.ts wrap lines theme={null}
import { tool } from "@langchain/core/tools";
import { z } from "zod";
import { getAsyncAuthorizationCredentials } from "@auth0/ai-langchain";
export const shopOnlineTool = tool(
async ({ product, qty, priceLimit }) => {
console.log(`Ordering ${qty} ${product} with price limit ${priceLimit}`);
const apiUrl = process.env["SHOP_API_URL"]!;
if (!apiUrl) {
// No API set, mock a response
return `Ordered ${qty} ${product}`;
}
const headers = {
"Content-Type": "application/json",
Authorization: "",
};
const body = {
product,
qty,
priceLimit,
};
const credentials = getAsyncAuthorizationCredentials();
const accessToken = credentials?.accessToken;
if (accessToken) {
headers["Authorization"] = "Bearer " + accessToken;
}
const response = await fetch(apiUrl, {
method: "POST",
headers: headers,
body: JSON.stringify(body),
});
return response.statusText;
},
{
name: "shop_online",
description: "Tool to buy products online",
schema: z.object({
product: z.string(),
qty: z.number(),
priceLimit: z.number().optional(),
}),
}
);
```
### Update environment variables
You need to [obtain an API Key from OpenAI](https://platform.openai.com/api-keys) or another provider to use an LLM.
If you want to use an API, it must be [registered with Auth0](https://auth0.com/docs/get-started/apis) and have a valid audience.
Update the `.env.local` file with the following variables:
```bash .env.local wrap lines theme={null}
# ... existing variables
# You can use any provider of your choice supported by Vercel AI
OPENAI_API_KEY="YOUR_API_KEY"
# API
SHOP_API_URL=
SHOP_API_AUDIENCE=sample-shop-api
```
### Require async authorization for your tool
Call the tool from your AI app to make purchases. Update the `src/lib/agent.ts` file with the following code:
```ts src/lib/agent.ts wrap lines highlight={2,3,9} theme={null}
//...
import { withAsyncAuthorization } from "./auth0-ai";
import { shopOnlineTool } from "./tools/shop-online";
//... existing code
const tools = [
//... existing tools
withAsyncAuthorization(shopOnlineTool),
];
//... existing code
```
### Test the application
Start the application with `npm run all:dev`. Then, navigate to `http://localhost:3000`.
This will open the LangGraph Studio in a new tab. You can close it as we won't
require it for testing the application.
You can ask the AI agent to buy a product, for example, "Buy an XYZ phone." Now, look for a push notification from the [Auth0 Guardian app](https://auth0.com/docs/mfa/auth0-guardian/user-enrollment) or your custom app integrated with the [Auth0 Guardian SDK](https://auth0.com/docs/secure/multi-factor-authentication/auth0-guardian) on your mobile device. Once you approve the notification, you should see the tool being executed and a response from the agent.
Explore the [example app on GitHub](https://github.com/auth0-samples/auth0-ai-samples/tree/main/asynchronous-authorization/langchain-next-js).
### Download sample app
Start by downloading and extracting the sample app. Then open in your preferred IDE.
### Install dependencies
In the root directory of your project, install the following dependencies:
* `@auth0/ai-vercel`: [Auth0 AI SDK for Vercel AI](https://github.com/auth0/auth0-ai-js/tree/main/packages/ai-vercel) built for AI agents powered by the Vercel AI SDK.
* `ai`: Core [Vercel AI SDK](https://sdk.vercel.ai/docs) module that interacts with various AI model providers.
* `@ai-sdk/openai`: [OpenAI](https://sdk.vercel.ai/providers/ai-sdk-providers/openai) provider for the Vercel AI SDK.
* `@ai-sdk/react`: [React](https://react.dev/) UI components for the Vercel AI SDK.
* `zod`: TypeScript-first schema validation library.
```bash wrap lines theme={null}
npm install @auth0/ai-vercel@5 ai@6 @ai-sdk/openai@3 @ai-sdk/react@3 zod@3.25.76
```
### Update the environment file
Copy the `.env.example` file to `.env.local` and update the variables with your Auth0 credentials. You can find your Auth0 domain, client ID, and client secret in the application you created in the Auth0 Dashboard.
### Set up Human-in-the-Loop approvals
Integrate the Auth0 AI SDK into your application to secure your async AI agent workflow. For this quickstart, we will use a blocking request flow. In real use cases, often an asynchronous flow is preferred.
#### Configure the Auth0 AI SDK
To require asynchronous authorization for your tool, the tool needs to be wrapped with the Async authorizer, `withAsyncAuthorization()`. Let's create a helper function to wrap the tool with the Async authorizer.
Create a file at `src/lib/auth0-ai.ts` and instantiate a new Auth0 AI SDK client:
```tsx src/lib/auth0-ai.ts wrap lines theme={null}
import { Auth0AI } from "@auth0/ai-vercel";
import { AccessDeniedInterrupt } from "@auth0/ai/interrupts";
import { getUser } from "./auth0";
const auth0AI = new Auth0AI();
// Async Authorization flow for user confirmation
export const withAsyncAuthorization = auth0AI.withAsyncAuthorization({
userID: async () => {
const user = await getUser();
return user?.sub as string;
},
bindingMessage: async ({ product, qty }) =>
`Do you want to buy ${qty} ${product}`,
scopes: ["openid", "product:buy"], // add any scopes you want to use with your API
audience: process.env["SHOP_API_AUDIENCE"]!,
/**
* Controls how long the authorization request is valid for.
*/
// requestedExpiry: 301,
/**
* The behavior when the authorization request is made.
*
* - `block`: The tool execution is blocked until the user completes the authorization.
* - `interrupt`: The tool execution is interrupted until the user completes the authorization.
* - a callback: Same as "block" but give access to the auth request and executing logic.
*
* Defaults to `interrupt`.
*
* When this flag is set to `block`, the execution of the tool awaits
* until the user approves or rejects the request.
* Given the asynchronous nature of the CIBA flow, this mode
* is only useful during development.
*
* In practice, the process that is awaiting the user confirmation
* could crash or timeout before the user approves the request.
*/
onAuthorizationRequest: async (authReq, creds) => {
console.log(`An authorization request was sent to your mobile device.`);
await creds;
console.log(`Thanks for approving the order.`);
},
onUnauthorized: async (e: Error) => {
if (e instanceof AccessDeniedInterrupt) {
return "The user has denied the request";
}
return e.message;
},
});
```
This will intercept the tool call to initiate a CIBA request:
* The CIBA request includes the user ID that will approve the request.
* Auth0 sends the user a mobile push notification. The AI agent polls the `/token` endpoint for a user response.
* The mobile application retrieves the `bindingMessage` containing the consent details, in this case, the details of the product to purchase.
* The user responds to the request:
* If the request is approved, the tool execution will continue.
* If the request is rejected, the tool execution will not continue.
Next, add the following code to `src/lib/auth0.ts`:
```tsx src/lib/auth0.ts wrap lines highlight={2-5} theme={null}
//... existing code
export const getUser = async () => {
const session = await auth0.getSession();
return session?.user;
};
```
#### Require async authorization for your tool
In this example, we wrap a tool that buys products on the user's behalf. When the user approves the transaction, the Auth0 AI SDK retrieves an access token to call the shop's API. Upon completing the CIBA flow, the AI agent responds with a message confirming the purchase.
The Auth0 AI SDK returns an error response if the user denies the transaction.
Now, create and wrap the tool with the Async authorizer. Create a file `src/lib/tools/shop-online.ts` and add the following code:
```ts src/lib/tools/shop-online.ts wrap lines theme={null}
import { tool } from "ai";
import { z } from "zod";
import { getAsyncAuthorizationCredentials } from "@auth0/ai-vercel";
import { withAsyncAuthorization } from "../auth0-ai";
export const shopOnlineTool = withAsyncAuthorization(
tool({
description: "Tool to buy products online",
parameters: z.object({
product: z.string(),
qty: z.number(),
priceLimit: z.number().optional(),
}),
execute: async ({ product, qty, priceLimit }) => {
console.log(`Ordering ${qty} ${product} with price limit ${priceLimit}`);
const apiUrl = process.env["SHOP_API_URL"]!;
if (!apiUrl) {
// No API set, mock a response or return error
return `Ordered ${qty} ${product}`;
}
const headers = {
"Content-Type": "application/json",
Authorization: "",
};
const body = {
product,
qty,
priceLimit,
};
const credentials = getAsyncAuthorizationCredentials();
const accessToken = credentials?.accessToken;
if (accessToken) {
headers["Authorization"] = "Bearer " + accessToken;
}
const response = await fetch(apiUrl, {
method: "POST",
headers: headers,
body: JSON.stringify(body),
});
return response.statusText;
},
})
);
```
### Update environment variables
You need to [obtain an API Key from OpenAI](https://platform.openai.com/api-keys) or another provider to use an LLM.
If you want to use an API, it must be [registered with Auth0](https://auth0.com/docs/get-started/apis) and have a valid audience.
Update the `.env.local` file with the following variables:
```bash .env.local wrap lines theme={null}
# ... existing variables
# You can use any provider of your choice supported by Vercel AI
OPENAI_API_KEY="YOUR_API_KEY"
# API (OPTIONAL)
SHOP_API_URL=
SHOP_API_AUDIENCE=sample-shop-api
```
### Integrate the tool into an AI agent
Call the tool from your AI app to make purchases. Update the `src/app/api/chat/route.ts` file with the following code:
```ts src/app/api/chat/route.ts wrap lines highlight={2,3,11,13} theme={null}
//...
import { setAIContext } from "@auth0/ai-vercel";
import { shopOnlineTool } from "@/lib/tools/shop-online";
//...
export async function POST(req: NextRequest) {
const { id, messages }: { id: string; messages: Array } = await req.json();
const tools = { shopOnlineTool };
setAIContext({ threadID: id });
const stream = createUIMessageStream({
async execute({ writer }) {
const result = streamText({
model: openai.chat('gpt-4o-mini'),
system: AGENT_SYSTEM_TEMPLATE,
messages: await convertToModelMessages(messages),
tools,
});
writer.merge(
result.toUIMessageStream({
sendReasoning: true,
}),
);
},
});
return createUIMessageStreamResponse({ stream });
}
//...
```
### Test the application
Start the application with `npm run dev`. Then, navigate to `http://localhost:3000`.
You can ask the AI agent to buy a product, for example, "Buy an XYZ phone." Now, look for a push notification from the [Auth0 Guardian app](https://auth0.com/docs/mfa/auth0-guardian/user-enrollment) or your custom app integrated with the [Auth0 Guardian SDK](https://auth0.com/docs/secure/multi-factor-authentication/auth0-guardian) on your mobile device. Once you approve the notification, you should see the tool being executed and a response from the agent.
Explore the [example app on GitHub](https://github.com/auth0-samples/auth0-ai-samples/tree/main/asynchronous-authorization/vercel-ai-next-js).
### Download sample app
Start by downloading and extracting the sample app. Then open in your preferred IDE.
The project is divided into two parts:
* `backend/`: contains the backend code for the Web app and API written in Python using FastAPI and the LangGraph agent.
* `frontend/`: contains the frontend code for the Web app written in React as a Vite SPA.
### Install dependencies
In the `backend` directory of your project, install the following dependencies:
* `auth0-ai-langchain`: [Auth0 AI SDK for LangChain](https://github.com/auth0/auth0-ai-python/tree/main/packages/auth0-ai-langchain) built for AI agents powered by LangChain.
* `langgraph`: [LangGraph](https://pypi.org/project/langgraph/) for building stateful, multi-factor applications with LLMs.
* `langchain-openai`: LangChain integrations for OpenAI.
* `langgraph-cli`: LangGraph CLI for running a local LangGraph server.
Make sure you have [uv](https://docs.astral.sh/uv/) installed and run the following command to install the dependencies:
```bash wrap lines theme={null}
cd backend
uv sync
uv add "auth0-ai-langchain>=1.0.1" "langgraph>=0.5.4" langchain-openai "langgraph-cli[inmem]>=0.3.6" --prerelease=allow
```
### Update the environment file
Copy the `.env.example` file to `.env` and update the variables with your Auth0 credentials. You can find your Auth0 domain, client ID, and client secret in the application you created in the Auth0 Dashboard.
### Set up Human-in-the-Loop approvals
Integrate the Auth0 AI SDK into your application to secure your async AI agent workflow. For this quickstart, we will use a blocking request flow. In real use cases, often an asynchronous flow is preferred.
#### Configure the Auth0 AI SDK
To require asynchronous authorization for your tool, the tool needs to be wrapped with the Async authorizer, `with_async_authorization()`. Let's create a helper function to wrap the tool with the Async authorizer.
Create a file at `app/core/auth0_ai.py` and instantiate a new Auth0 AI SDK client:
```python app/core/auth0_ai.py wrap lines theme={null}
from auth0_ai.authorizers.types import Auth0ClientParams
from auth0_ai_langchain.auth0_ai import Auth0AI
from langchain_core.runnables import ensure_config
from app.core.config import settings
auth0_ai = Auth0AI(
Auth0ClientParams(
{
"domain": settings.AUTH0_DOMAIN,
"client_id": settings.AUTH0_CLIENT_ID,
"client_secret": settings.AUTH0_CLIENT_SECRET,
}
)
)
with_async_authorization = auth0_ai.with_async_authorization(
audience=settings.SHOP_API_AUDIENCE,
# param: scopes
# add any scopes you want to use with your API
scopes=["openid", "product:buy"],
binding_message=lambda product, quantity: f"Do you want to buy {quantity} {product}",
user_id=lambda *_, **__: ensure_config()
.get("configurable")
.get("_credentials")
.get("user")
.get("sub"),
# param: requested_expiry
# Controls how long the authorization request is valid.
# requested_expiry=301,
# param: on_authorization_request
# When this flag is set to `block`, the execution of the tool awaits
# until the user approves or rejects the request.
#
# Given the asynchronous nature of the CIBA flow, this mode
# is only useful during development.
#
# In practice, the process that is awaiting the user confirmation
# could crash or timeout before the user approves the request.
on_authorization_request="block",
# requested_expiry=301,
)
```
This will intercept the tool call to initiate an Async Authorization request:
* The Async Authorization request includes the user ID that will approve the request.
* Auth0 sends the user a mobile push notification. The AI agent polls the `/token` endpoint for a user response.
* The mobile application retrieves the `bindingMessage` containing the consent details, in this case, the details of the product to purchase.
* The user responds to the request:
* If the request is approved, the tool execution will continue.
* If the request is rejected, the tool execution will not continue.
#### Pass credentials to the tools
Update the API route to pass the user session data to the agent in `app/api/routes/chat.py`:
```python app/api/routes/chat.py wrap lines highlight={2,9,21} theme={null}
# ...
from app.core.auth import auth_client
# ...
@agent_router.api_route(
"/{full_path:path}", methods=["GET", "POST", "DELETE", "PATCH", "PUT", "OPTIONS"]
)
async def api_route(
request: Request, full_path: str, auth_session=Depends(auth_client.require_session)
):
try:
# ... existing code
# Prepare body
body = await request.body()
if request.method in ("POST", "PUT", "PATCH") and body:
content = await request.json()
content["config"] = {
"configurable": {
"_credentials": {
"user": auth_session.get("user"),
}
}
}
body = json.dumps(content).encode("utf-8")
# ... existing code
```
#### Create a tool to call your API
In this example, we use a tool that buys products on the user's behalf. When the user approves the transaction, the Auth0 AI SDK retrieves an access token to call the shop's API. Upon completing the Async Authorization flow, the AI agent responds with a message confirming the purchase. The Auth0 AI SDK returns an error response if the user denies the transaction.
Now, create a file `app/agents/tools/shop_online.py` and add the following code:
```python app/agents/tools/shop_online.py wrap lines theme={null}
import httpx
from langchain_core.tools import StructuredTool
from auth0_ai_langchain.async_authorization import get_async_authorization_credentials
from pydantic import BaseModel
from app.core.auth0_ai import with_async_authorization
from app.core.config import settings
class BuyOnlineSchema(BaseModel):
product: str
quantity: int
async def shop_online_fn(product: str, quantity: int):
"""Tool to buy products online."""
api_url = settings.SHOP_API_URL
if not api_url.strip():
# No API set, mock a response
return f"Ordered {quantity} {product}"
credentials = get_async_authorization_credentials()
if not credentials:
raise ValueError("Async Authorization credentials not found")
headers = {
"Authorization": f"Bearer {credentials['access_token']}",
"Content-Type": "application/json",
}
data = {
"product": product,
"quantity": quantity,
}
try:
async with httpx.AsyncClient() as client:
response = await client.post(
api_url,
headers=headers,
json=data,
)
if response.status_code != 200:
raise ValueError(f"Failed to buy product: {response.text}")
return response.json()
except httpx.HTTPError as e:
return {
"success": False,
"error": f"Failed to buy product: {str(e)}",
}
shop_online = with_async_authorization(
StructuredTool(
name="shop_online",
description="Tool to buy products online.",
args_schema=BuyOnlineSchema,
coroutine=shop_online_fn,
)
)
```
### Update environment variables
You need to [obtain an API Key from OpenAI](https://platform.openai.com/api-keys) to use an LLM.
If you want to use an API, it must be [registered with Auth0](https://auth0.com/docs/get-started/apis) and have a valid audience.
Update the `.env` file with the following variables:
```bash .env wrap lines theme={null}
# ... existing variables
# OpenAI API configuration
OPENAI_API_KEY="YOUR_API_KEY"
# Shop API configuration
SHOP_API_URL=
SHOP_API_AUDIENCE="https://api.shop-online-demo.com"
```
Update your `app/core/config.py` to include the shop audience:
```python app/core/config.py wrap lines highlight={4,5} theme={null}
# ...
class Settings(BaseSettings):
# ... existing code
SHOP_API_URL: str = ""
SHOP_API_AUDIENCE: str = ""
# ... existing code
```
### Require async authorization for your tool
Call the tool from your AI app to make purchases. Update the `app/agents/assistant0.py` file with the following code:
```python app/agents/assistant0.py wrap lines highlight={2,4} theme={null}
# ...
from app.agents.tools.shop_online import shop_online
tools = [shop_online]
llm = ChatOpenAI(model="gpt-4.1-mini")
# ... existing code
agent = create_react_agent(
llm,
tools=ToolNode(tools, handle_tool_errors=False),
prompt=get_prompt(),
)
```
### Test your application
To test the application, start the FastAPI backend, LangGraph server, and the frontend:
1. In a new terminal, start the FastAPI backend:
```bash wrap lines theme={null}
cd backend
source .venv/bin/activate
fastapi dev app/main.py
```
2. In another terminal, start the LangGraph server:
```bash wrap lines theme={null}
cd backend
source .venv/bin/activate
uv pip install -U langgraph-api
langgraph dev --port 54367 --allow-blocking
```
This will open the LangGraph Studio in a new tab. You can close it as we won't
require it for testing the application.
3. In another terminal, start the frontend:
```bash wrap lines theme={null}
cd frontend
cp .env.example .env # Copy the `.env.example` file to `.env`.
npm install
npm run dev
```
Visit the URL `http://localhost:5173` in your browser and interact with the AI agent.
You can ask the AI agent to buy a product, for example, "Buy an XYZ phone." Now, look for a push notification from the [Auth0 Guardian app](https://auth0.com/docs/mfa/auth0-guardian/user-enrollment) or your custom app integrated with the [Auth0 Guardian SDK](https://auth0.com/docs/secure/multi-factor-authentication/auth0-guardian) on your mobile device. Once you approve the notification, you should see the tool being executed and a response from the agent.
That's it! You've successfully integrated asynchronous authorization into your LangGraph FastAPI project.
Explore the [example app on GitHub](https://github.com/auth0-samples/auth0-ai-samples/tree/main/asynchronous-authorization/langchain-fastapi-py).
### Install dependencies
Install the following dependencies:
* `ai`: Core [Vercel AI SDK](https://sdk.vercel.ai/docs) module that interacts with various AI model providers.
* `zod`: TypeScript-first schema validation library.
* `dotenv`: A module that loads environment variables from a `.env` file.
* `auth0`: [Auth0 Node.js](https://github.com/auth0/node-auth0) library.
* `@ai-sdk/openai`: [OpenAI](https://sdk.vercel.ai/providers/ai-sdk-providers/openai) provider for the [Vercel AI SDK](https://sdk.vercel.ai/docs).
* `@auth0/ai-vercel`: [Auth0 AI SDK for Vercel AI](https://github.com/auth0/auth0-ai-js/tree/main/packages/ai-vercel) built for AI agents powered by the Vercel AI SDK.
```bash Create a new Node.js project wrap lines theme={null}
npm init -y
npm i auth0@5 @auth0/ai-vercel@5 zod@3.25.76 ai@6 @ai-sdk/openai@3 dotenv@16
```
Add the below to `package.json`:
```json package.json wrap lines theme={null}
"main": "index.js",
"x-type": "module",
"scripts": {
"start": "npx tsx src/index.ts"
},
```
### Integrate Auth0 AI SDK
Integrate the [Auth0 AI SDK](https://github.com/auth0/auth0-ai-js) into your application to secure your async AI agent workflow.
#### 1. Create your environment file
In the root directory of your project, create the `.env` file and add the following variables. You can find your Auth0 domain, client ID, and client secret in the application you created in the Auth0 Dashboard.
```bash .env wrap lines theme={null}
AUTH0_DOMAIN=''
AUTH0_CLIENT_ID=''
AUTH0_CLIENT_SECRET=''
# You can use any provider of your choice supported by Vercel AI
OPENAI_API_KEY="YOUR_API_KEY"
# API
STOCK_API_URL=
STOCK_API_AUDIENCE=sample-stock-api
```
#### 2. Require async authorization for your tool
To require asynchronous authorization for your tool wrap the tool with the Async authorizer, `withAsyncAuthorization()`.
Wrap the tool with the Async authorizer in `src/lib/tools/buy.ts`. This will intercept the tool call to initiate an Async Authorization request:
* The Async Authorization request includes the user ID that will approve the request.
* Auth0 sends the user a mobile push notification. The AI agent polls the `/token` endpoint for a user response.
* The mobile application retrieves the `binding_message` containing the consent details, in this case, the quantity of stock to purchase for a stock ticker.
* The user responds to the request:
* If the request is approved, the tool execution will continue.
* If the request is rejected, the tool execution will not continue.
In our example, we wrap a tool that buys shares for a given stock picker on the user’s behalf. When the user approves the transaction, the Auth0 AI SDK retrieves an access token to call the stock’s API. Upon completing the CIBA flow, the AI agent responds with a message confirming the purchase.
The Auth0 AI SDK returns an error response if the user denies the transaction.
Now, create and wrap the tool with the Async authorizer. Create a file `src/lib/tools/buy.ts` and add the following code:
```ts src/lib/tools/buy.ts wrap lines theme={null}
import "dotenv/config";
import { tool } from "ai";
import { z } from "zod";
import { Auth0AI, getAsyncAuthorizationCredentials } from "@auth0/ai-vercel";
import { AccessDeniedInterrupt } from "@auth0/ai/interrupts";
export type Context = {
userId: string;
};
const auth0AI = new Auth0AI();
export const buy = (context: Context) => {
// highlight-next-line
const withAsyncAuthorization = auth0AI.withAsyncAuthorization({
// highlight-next-line
userID: context.userId,
// highlight-next-line
bindingMessage: async ({ ticker, qty }) =>
// highlight-next-line
`Do you want to buy ${qty} shares of ${ticker}`,
scopes: ["openid", "stock:trade"],
audience: process.env["STOCK_API_AUDIENCE"]!,
/**
* Controls how long the authorization request is valid for.
*/
// requestedExpiry: 301,
/**
* The behavior when the authorization request is made.
*
* - `block`: The tool execution is blocked until the user completes the authorization.
* - `interrupt`: The tool execution is interrupted until the user completes the authorization.
* - a callback: Same as "block" but give access to the auth request and executing logic.
*
* Defaults to `interrupt`.
*
* When this flag is set to `block`, the execution of the tool awaits
* until the user approves or rejects the request.
* Given the asynchronous nature of the CIBA flow, this mode
* is only useful during development.
*
* In practice, the process that is awaiting the user confirmation
* could crash or timeout before the user approves the request.
*/
onAuthorizationRequest: async (_authReq, creds) => {
console.log(
`An authorization request was sent to your mobile device.`
);
await creds;
console.log(`Thanks for approving the order.`);
},
onUnauthorized: async (e: Error) => {
if (e instanceof AccessDeniedInterrupt) {
return "The user has deny the request";
}
return e.message;
},
});
return withAsyncAuthorization(
tool({
description: "Use this function to buy stock",
inputSchema: z.object({
ticker: z.string(),
qty: z.number(),
}),
execute: async ({ ticker, qty }) => {
const headers = {
"Content-Type": "application/json",
};
const body = {
ticker: ticker,
qty: qty,
};
// highlight-next-line
const credentials = getAsyncAuthorizationCredentials();
const accessToken = credentials?.accessToken?.value;
if (accessToken) {
headers["Authorization"] = "Bearer " + accessToken;
}
console.log("Executing request to buy stock");
const response = await fetch(process.env["STOCK_API_URL"]!, {
method: "POST",
headers: headers,
body: JSON.stringify(body),
});
return response.statusText;
},
})
);
};
```
#### 3. Integrate the tool into an AI agent
Create a file at `src/index.ts` and add tool calling to the Vercel AI agent using the `generateText()` or `streamText()` functions:
```ts src/index.ts wrap lines theme={null}
import { setAIContext } from "@auth0/ai-vercel";
import crypto from "node:crypto";
import { generateText, stepCountIs } from "ai";
import { openai } from "@ai-sdk/openai";
import { buy } from "./lib/tools/buy";
async function main() {
const threadID = crypto.randomUUID();
setAIContext({ threadID });
const userPrompt = "Use the buy tool to purchase 3 shares of Google (GOOGL) stock";
const { text } = await generateText({
model: openai("gpt-4o-mini"),
system: "You are an assistant. Invoke the tool if needed, then respond with a past-tense confirmation.",
prompt: userPrompt,
// pass an Auth0 user id. For example, 'auth0|100000000000000000000' or 'google-oauth2|100000000000000000000'
tools: { buy: buy({ userId: "" }) },
stopWhen: stepCountIs(3), // tool call + result + final assistant message
});
console.log("Final response:", (text && text.trim()) || "");
}
main().catch(console.error);
```
You should now have a CLI app that allows you to interact with the AI agent.
### Test the application
To test the CLI app, set a prompt, such as "Buy 3 stocks of Google," and pass it the user ID of the user approving or declining the transaction. You can get the user ID from the [Auth0 Dashboard](https://manage.auth0.com/).
To get the user ID, navigate to **User Management** > **Users** and click on a user. The ID should look like `auth0|123456789`.
Now, run `npm start` and look for a push notification from the Auth0 Guardian app or your [custom app integrated with the Auth0 Guardian SDK](https://auth0.com/docs/get-started/authentication-and-authorization-flow/client-initiated-backchannel-authentication-flow/user-authorization-with-ciba) on your mobile device. Once you approve the notification, you should see the tool being executed on your console.
Explore [the example app on GitHub](https://github.com/auth0-samples/auth0-ai-samples/tree/main/asynchronous-authorization/vercel-ai-node-js).
## Next steps
You have successfully added an authorization step to protect tool calling in asynchronous AI agents. For next steps:
* [Asynchronous Authorization docs](/intro/asynchronous-authorization).
* Learn more about the [Client-Initiated Backchannel Authentication Flow](https://auth0.com/docs/get-started/authentication-and-authorization-flow/client-initiated-backchannel-authentication-flow).
* Learn how to [Configure Rich Authorization Requests](https://auth0.com/docs/get-started/apis/configure-rich-authorization-requests).
* Learn more about [Auth0 Guardian Android SDK](https://auth0.com/docs/secure/multi-factor-authentication/auth0-guardian/guardian-for-android-sdk).
* Learn more about [Auth0 Guardian iOS SDK](https://auth0.com/docs/secure/multi-factor-authentication/auth0-guardian/guardian-for-ios-sdk).
 If the user is not enrolled, you can send an enrollment request by email:

 #### Pass credentials to the tools
Next, add the following code to `src/lib/auth0.ts`:
```tsx src/lib/auth0.ts wrap lines highlight={12-20} theme={null}
//... existing code
export const auth0 = new Auth0Client({
authorizationParameters: {
// In v4, the AUTH0_SCOPE and AUTH0_AUDIENCE environment variables are no longer automatically picked up by the SDK.
// Instead, we need to provide the values explicitly.
scope: process.env.AUTH0_SCOPE,
audience: process.env.AUTH0_AUDIENCE,
},
});
// Get the Access token from Auth0 session
export const getAccessToken = async () => {
const tokenResult = await auth0.getAccessToken();
if(!tokenResult || !tokenResult.token) {
throw new Error("No access token found in Auth0 session");
}
return tokenResult.token;
};
```
Update the `/src/app/api/chat/[..._path]/route.ts` file with the following code. The access token will be passed to your LangGraph agent so we can use it from the Auth0 AI SDK to get the current user.
```ts src/app/api/chat/[..._path]/route.ts wrap lines highlight={3,9-13} theme={null}
import { initApiPassthrough } from "langgraph-nextjs-api-passthrough";
import { getAccessToken } from "@/lib/auth0";
export const { GET, POST, PUT, PATCH, DELETE, OPTIONS, runtime } =
initApiPassthrough({
apiUrl: process.env.LANGGRAPH_API_URL,
baseRoute: "chat/",
headers: async () => {
const accessToken = await getAccessToken();
return {
Authorization: `Bearer ${accessToken}`,
};
});
```
### Add Custom Authentication
#### Pass credentials to the tools
Next, add the following code to `src/lib/auth0.ts`:
```tsx src/lib/auth0.ts wrap lines highlight={12-20} theme={null}
//... existing code
export const auth0 = new Auth0Client({
authorizationParameters: {
// In v4, the AUTH0_SCOPE and AUTH0_AUDIENCE environment variables are no longer automatically picked up by the SDK.
// Instead, we need to provide the values explicitly.
scope: process.env.AUTH0_SCOPE,
audience: process.env.AUTH0_AUDIENCE,
},
});
// Get the Access token from Auth0 session
export const getAccessToken = async () => {
const tokenResult = await auth0.getAccessToken();
if(!tokenResult || !tokenResult.token) {
throw new Error("No access token found in Auth0 session");
}
return tokenResult.token;
};
```
Update the `/src/app/api/chat/[..._path]/route.ts` file with the following code. The access token will be passed to your LangGraph agent so we can use it from the Auth0 AI SDK to get the current user.
```ts src/app/api/chat/[..._path]/route.ts wrap lines highlight={3,9-13} theme={null}
import { initApiPassthrough } from "langgraph-nextjs-api-passthrough";
import { getAccessToken } from "@/lib/auth0";
export const { GET, POST, PUT, PATCH, DELETE, OPTIONS, runtime } =
initApiPassthrough({
apiUrl: process.env.LANGGRAPH_API_URL,
baseRoute: "chat/",
headers: async () => {
const accessToken = await getAccessToken();
return {
Authorization: `Bearer ${accessToken}`,
};
});
```
### Add Custom Authentication